Note
2 Mar 2022: Expanded to include previous presentation materials titled "Minimalist Modelling and Coding of Revit for Quantities" presented in February 2014 and January 2015 both in Kuala Lumpur, and on 6 April 2016 in Hong Kong and 2 March 2022 at HKIS.
12 Mar 2015: Created. Titled "Export Revit schedules to Excel.
Intro
One can model BIM to the last bolt and nut and can use third party software to take-off quantities from the BIM model, but this would mean extra work and more license fees.
This article would show how a Revit model and its families of building blocks can be built, coded and scheduled in a minimalist and self-explanatory manner appropriate and sufficient enough for producing auditable dimensions and quantities for costing.
Overview
Capabilities of Revit
Can Revit produce Bills of Quantities from Revit model with the press of a button?
- No.
- It is a modelling software, not a BQ production software.
Can Revit model provide quantities?
- Yes.
- Revit being a building information modelling (“BIM”) software defines its building blocks (“elements”) with parameters which contain a lot of information including quantities of work and materials.
- That’s why BIM is called “parametric modelling”.
Are the quantities in compliance with the standard method of measurement?
- No.
- The SMMs of different countries vary.
Are the quantities provided by a Revit model sufficient and ready enough to be converted to quantities according to the standard method of measurement?
- No.
- Some parameters are not schedulable.
- The lengths, areas and volumes of elements provided by a Revit model may not be the desired lengths, areas and volumes for SMM purposes.
- Concrete shoulders at junctions of different mixes are not available.
- Formwork areas are not available.
- Wall and ceiling finish areas are not readily available.
Then, how can we use Revit model to produce quantities for estimates or BQ?
- There are third party quantity take-off software which can help extract quantities from a Revit model and provide them for estimates, bills of quantities and other uses.
- However, one would still need to write the descriptions and do some linking between the descriptions and the modelling elements.
- The linking resembles on-screen taking-off.
- Depending on the suitability of the model, the linking process may be quick or tedious.
- For some software, extensive formulae would need to be set-up.
- This is difficult to check individually and is therefore prone to errors.
- The beauty of such QTO software is that once the descriptions and linking are done, any changes to the models can be monitored.
- The downside is one has to invest in the license and training costs.
When descriptions are required to be written and quantities required to be classified according to the SMM, Quantity Surveyors are still required.
Can we still get something useful from Revit models without third party QTO software?
- Yes, it is the purpose of this article to explain.
Should QS build models?
Are Revit models readily available from Architects and Engineers?
- Probably not yet for most of the cases.
- While QTO software can handle 2D CAD drawings, the on-screen taking-off process would be more tedious for 2D CAD drawings.
Without a BIM model, should QS build up models?
- QS has evolved from dimension sheet, cut-and-shuffle, schedule, scale rule, curvimeter, planimeter, Lotus 1-2-3 spreadsheet, Excel worksheet, digitizer, on-screen taking off, etc.
- There is no reason why the QTO must be textural and not graphical.
- Having learned the basic tools, modelling the basic features with Revit is easier than with 2D CAD software.
- It should be within the capability of the average QS to learn, only if he or she has time.
- For the bulk items like structure, fabric and finishes, the time to model and get quantities would be shorter than the time to do manual taking off or on-screen taking off from 2D CAD drawings.
- Even if models are provided by Architects and Engineers, they may not have been modelled in such a way suitable for QTO.
- QS should be able to inspect and understand the models in order to use the models.
- Furthermore, in order not to disturb the integrity of the models provided by the Architects and Engineers, QS would probably need his own set of “QS parameters” and adjust the parameters for his own purposes.
- Therefore, the answer should be "yes".
- QS should build up models in the absence of models or should be able to modify models to suit.
Should QS model every detail?
- No.
- Items like windows, doors, fittings and furniture vary in details between different projects and take some longer time to model.
- All that QS needs is the number for writing up full descriptions or measuring the component quantities per number with reference to the detailed drawings provided by the Architects and Engineers.
- It should however be noted that the level of details of the models if provided by the Architects and Engineers should be no less than those traditionally provided for 2D CAD drawings for estimating, tendering and construction. This should be a simpler benchmark than whatever Level of Development or Level of Details (LOD) or Level of Information Need definitions.
How much do we need to measure?
We may measure every bit of concrete, formwork, finishes, etc. exactly net when we measure the concrete members or room finishes.
However, see the following table for the inter-relationship between dimensions and quantities:
|
Description |
Primary Qty |
Multiplier |
Unit |
|---|---|---|---|
|
Wall - grade C40 - T thick (centre line area) |
A |
|
Super |
|
A |
T |
Cube |
|
A |
2 |
Super |
|
|
|
|
|
|
|
|
|
|
|
|
|
Column - grade C40 - W wide x D deep (height) |
H |
|
Run |
|
H |
W x D |
Cube |
|
H |
(W + D) x 2 |
Super |
|
|
|
|
|
Suspended beam - grade C30 - W wide x D deep - S slab (length) |
L |
|
Run |
|
L |
W x (D – S) |
Cube |
|
L |
W + (D – S) x 2 |
Super |
|
L |
W x -1 |
Super |
|
|
|
|
|
Suspended slab - grade C30 - S thick (area) |
A |
|
Super |
|
A |
S |
Cube |
|
A |
|
Super |
|
|
|
|
|
|
|
|
|
Room - finishes group A - net plan area |
A |
|
Super |
|
A |
|
Super |
|
A |
|
Super |
|
|
|
|
|
|
|
|
|
|
|
|
|
Room - finishes group A - perimeter including columns - H room height - S skirting height |
L |
|
Run |
|
L |
|
Run |
|
L |
H – S |
Super |
|
|
|
|
|
|
|
|
|
|
|
|
|
Window W1 - W wide x H high opening - T thick concrete wall - Room A |
N |
|
Nr |
|
N |
|
Nr |
|
N |
Detailed dimensions of W1 |
Super |
|
N |
W x H x T x -1 |
Cube |
|
N |
W x H x 2 |
Super |
|
N |
W + H x 2 |
Run |
|
N |
W x H x -1 |
Super |
|
N |
(W + H x 2) x reveal width |
Run |
|
N |
W |
Run |
|
Door D1 - W wide x H high opening - T thick brickwall - Room finishes group A |
N |
|
Nr |
|
N |
|
Nr |
|
N |
W x H x -1 |
Super |
|
N |
W + end laps x 2 |
Run |
|
N |
W |
Run |
|
N |
W x H x -1 |
Super |
|
N |
W x part of T as appropriate |
Run |
|
N |
Detailed dimensions of D1 |
As appropriate |
The above shows that:
- We may measure the:
- aggregate areas of different wall and slab thicknesses,
- aggregate lengths of different column and beam sections,
- aggregate plan areas and girths of rooms of the same finishes first (we may call these “primary quantities”, those without bullets),
- before converting them into concrete, formwork and finishes quantities (we may call these “secondary quantities”, those with bullets).
- We may measure the overall gross quantities first before making detailed adjustments.
- Some adjustments can be made when we measure other elements, e.g.:
- deduct slab formwork using beam quantities,
- adjust for wall openings when using window and door quantities, etc.
- The descriptions can be very short only to the extent of containing sufficient information for the purposes of the multiplier.
It follows that instead of expecting a Revit model to provide the quantity of every BQ item, we can just:
- extract the primary quantities adequately described from the Revit model; and
- use Excel to handle the secondary processing.
The need for modelling to the last bolt and nut is reduced.
Excel in fact is more powerful for setting up complicated formulae, and for sorting and filtering rows.
Coding and why?
To convey the information from Revit to Excel, it would be good if the information is described in a concise, precise and consistent manner.
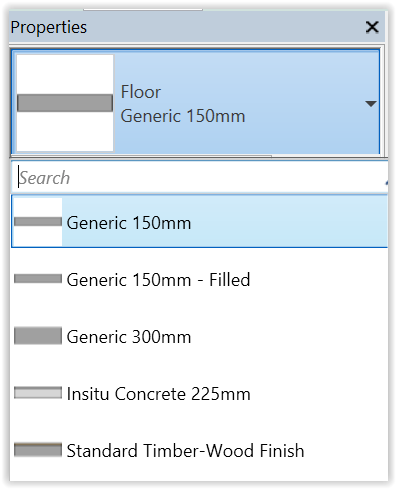
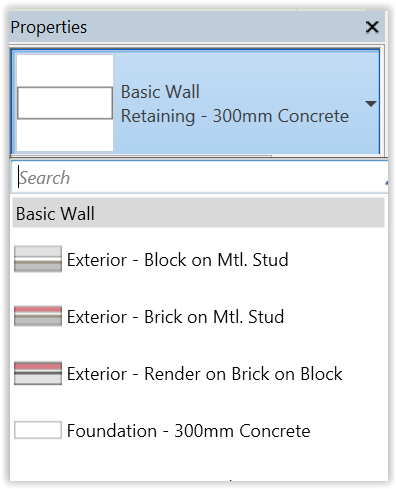
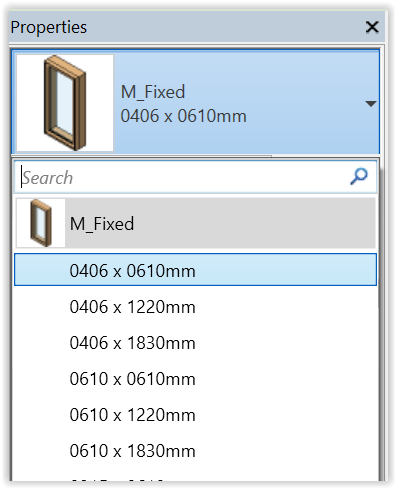
All Revit elements are classified and described by Family (Floor, Basic Wall, M_Fixed in the following images) and Types (those under the Search prompts in the images), but these descriptions may not contain the information the way we want and we would need to change them anyway.
Furthermore, if the model is provided by the Architect or Engineer and we do not want to change their descriptions of Families and Types, we may need to create a parameter to contain the precise and consistent information we need.
The following coding (“QS Desc”) should be sufficient and self-explanatory enough yet short and simple to represent the primary quantities in the above table:
- WA-C40-100
- CL-C40-500x600
- BM-C30-300500 : 120SL
- SL-C30-120
- RM-F-A
- RM-P-A
- WD-W1-1200x1500 : IWConc100-RoomA
- DR-D1-920x2200 : IWBrick125-RoomA
This way of coding should be more intuitive and understandable than those cryptic codes using (alpha) numeric codes.
CIC BIM Standards promote the use of FLIP as the element names. It is not that suitable for QS use. Conversion from FLIP to "QS Desc" would be necessary.
It should be easier to do the conversion in bulk with Excel than with Revit schedules.
Schedules / Quantities
Revit schedules
Revit has the capabilities to produce many schedules, under the project browser:
With so many schedules to represent a modelled project, the choices of the columns in the schedules must be well co-ordinated.
We cannot practically transfer the individual total quantity from the schedules manually one by one for billing purposes.
This would be prone to errors.
The above schedule has been designed such that:
- The left 6 columns are consistently designed for all schedules.
- The Level and Mark are for locational identification of the quantities, like our dimension sheets, for traceability.
- Only the Type, QS Tag, QS Qty and QS Unit are really essential for billing.
- The other columns are there for calculating the QS Qty or cross-checking, and can vary from schedules to schedules.
Export function provided by Revit
Revit can also export the schedules to a txt file which can then be imported by Excel to become a worksheet for use:
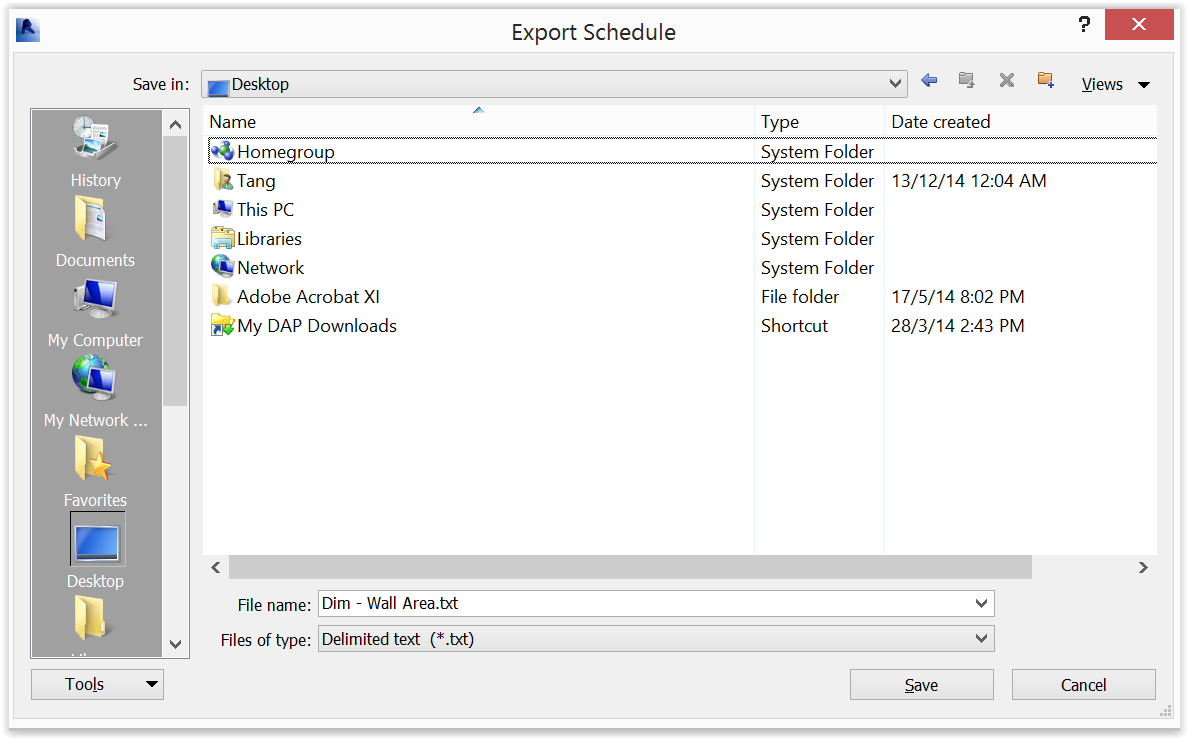
However, the export can only handle one schedule at a time.
This would be a tedious process to export many schedules one at a time and merge all schedules together.
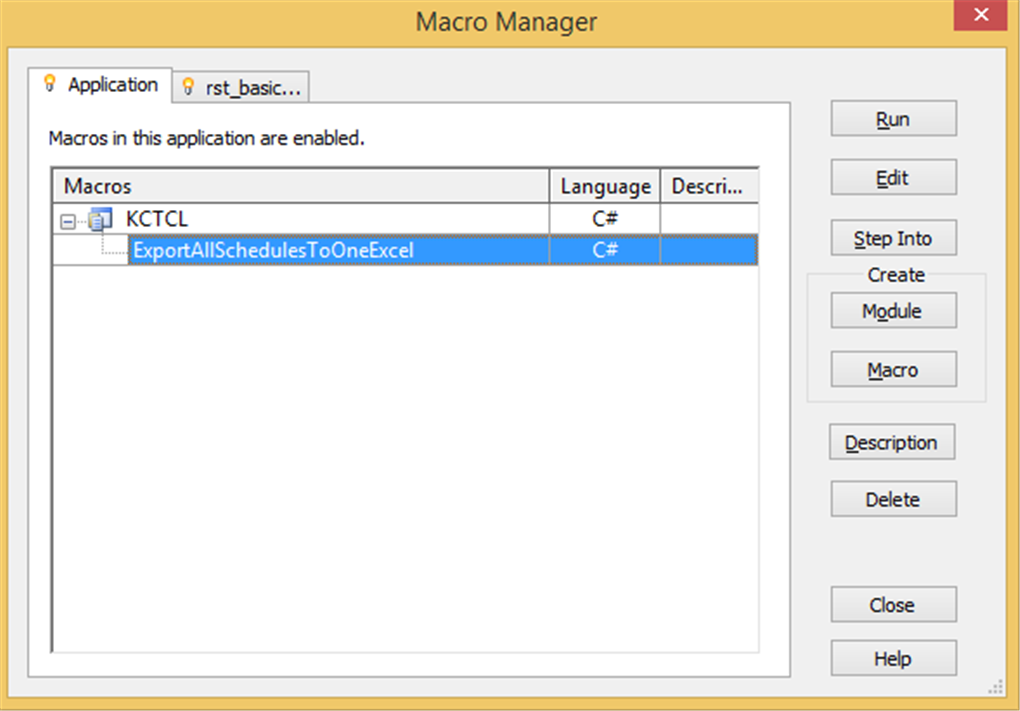
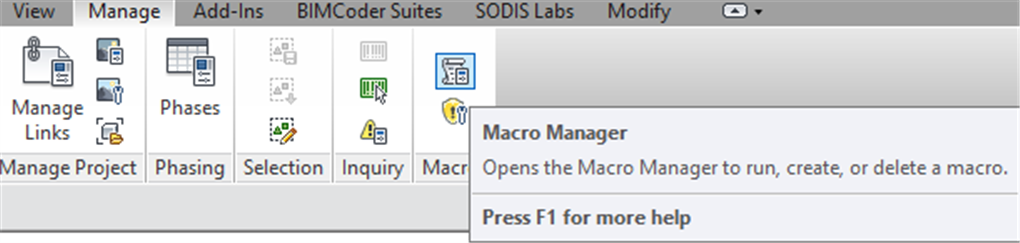
Use macro to export to Excel
A macro (see later below) has been written whereby:
- All the schedules will be exported by a single command to one Excel file with one worksheet per schedule.
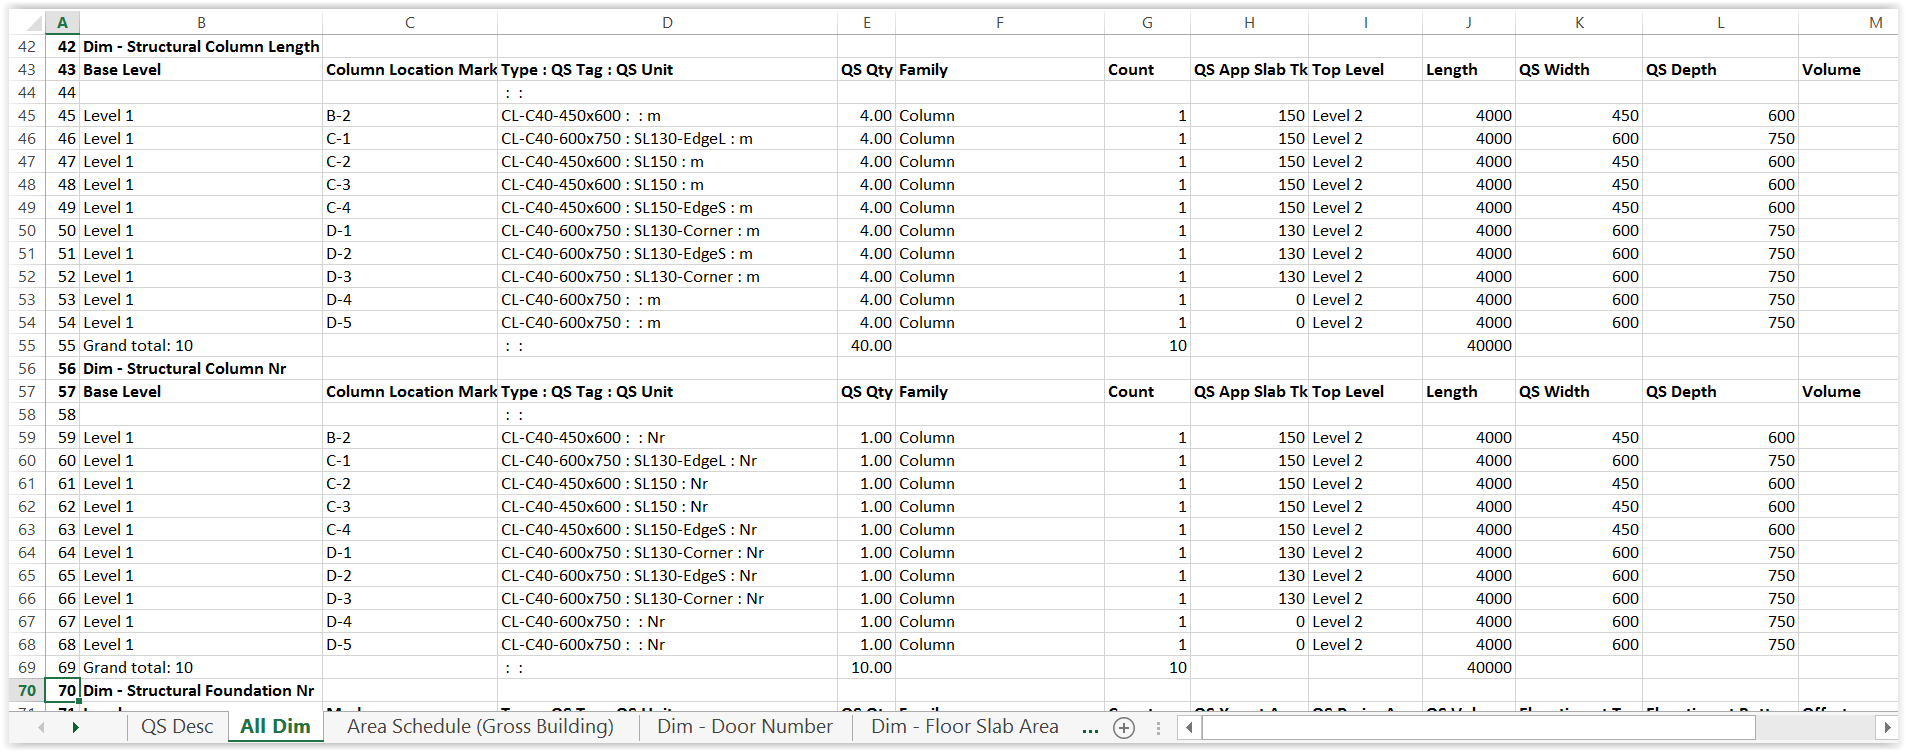
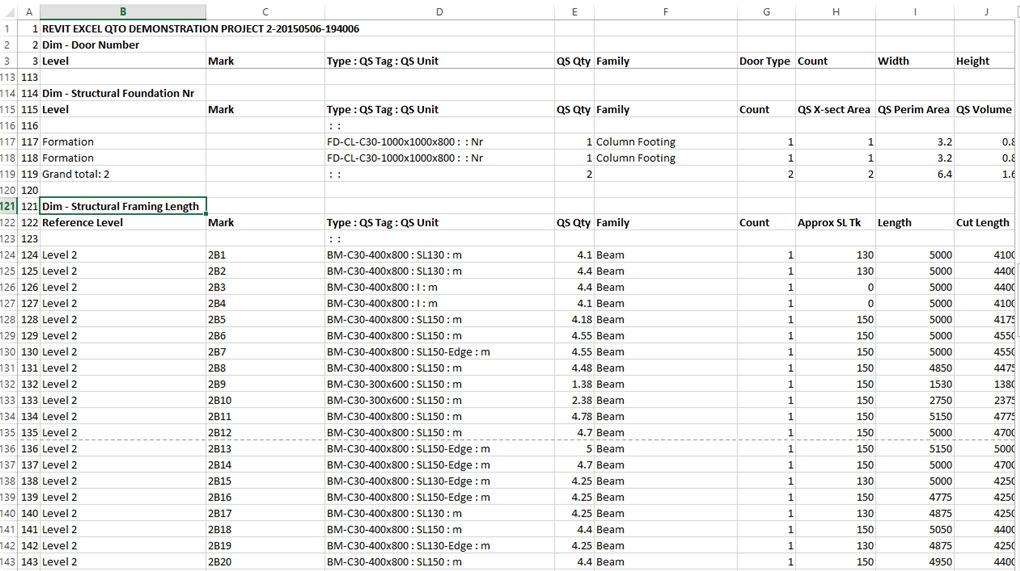
- Schedules intended to provide the uniform left 6 columns for billing should have their names prefixed by “Dim – ” and the macro will combine the 3 columns of Type, QS Tag and QS Unit into a single “QS Desc” column in the style of “Type : QS Tag : QS Unit”.
- An “All Dim” worksheet will be created to repeat all information contained in the “Dim – ” schedules:
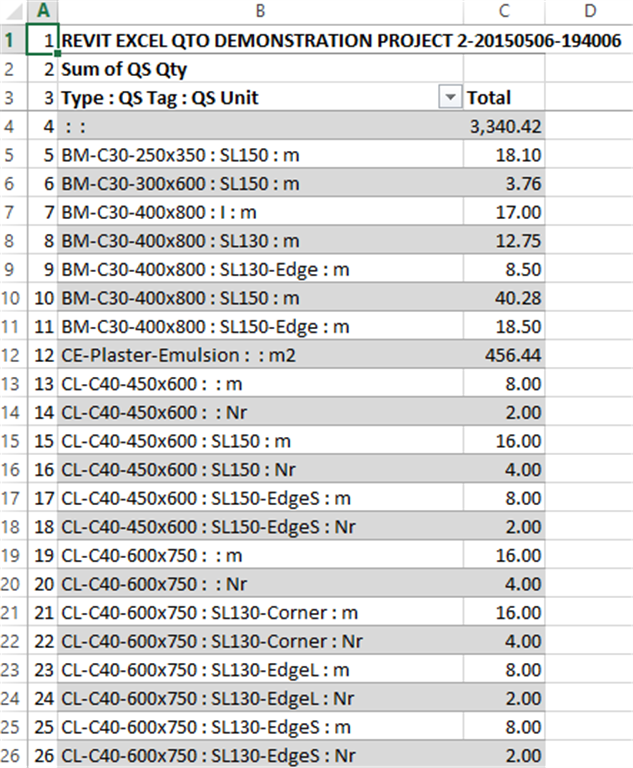
- A “QS Desc” worksheet will be created to contain a list of the unique QS Desc and their total QS Qty:
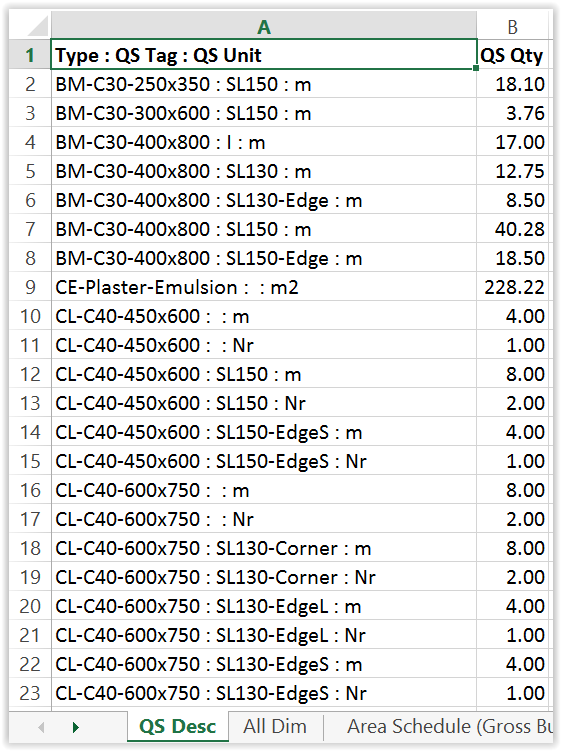
- The total QS Qty will be useful for quick reference.
- The Excel file name will contain the time down to the second it is created so that a re-export will not overwrite an existing Excel file.
This macro vastly reduces the time to export Revit schedules to Excel worksheets.
Billing Workflow
Overall
The primary quantities in the “All Dim” worksheet can be further processed for billing. The workflow are as follows:
- Data --> (extraction from Revit schedules) --> Primary Qty --> (processing ) --> Secondary Qty --> (processing ) --> Estimate or BQ.
- Data --> (direct measurement without using Revit) --> Primary Qty --> (processing ) --> Secondary Qty --> (processing ) --> Estimate or BQ.
Primary worksheet
The first 5 columns only of the “All Dim” worksheet shown above are copied to the lower region of a “Primary worksheet”:
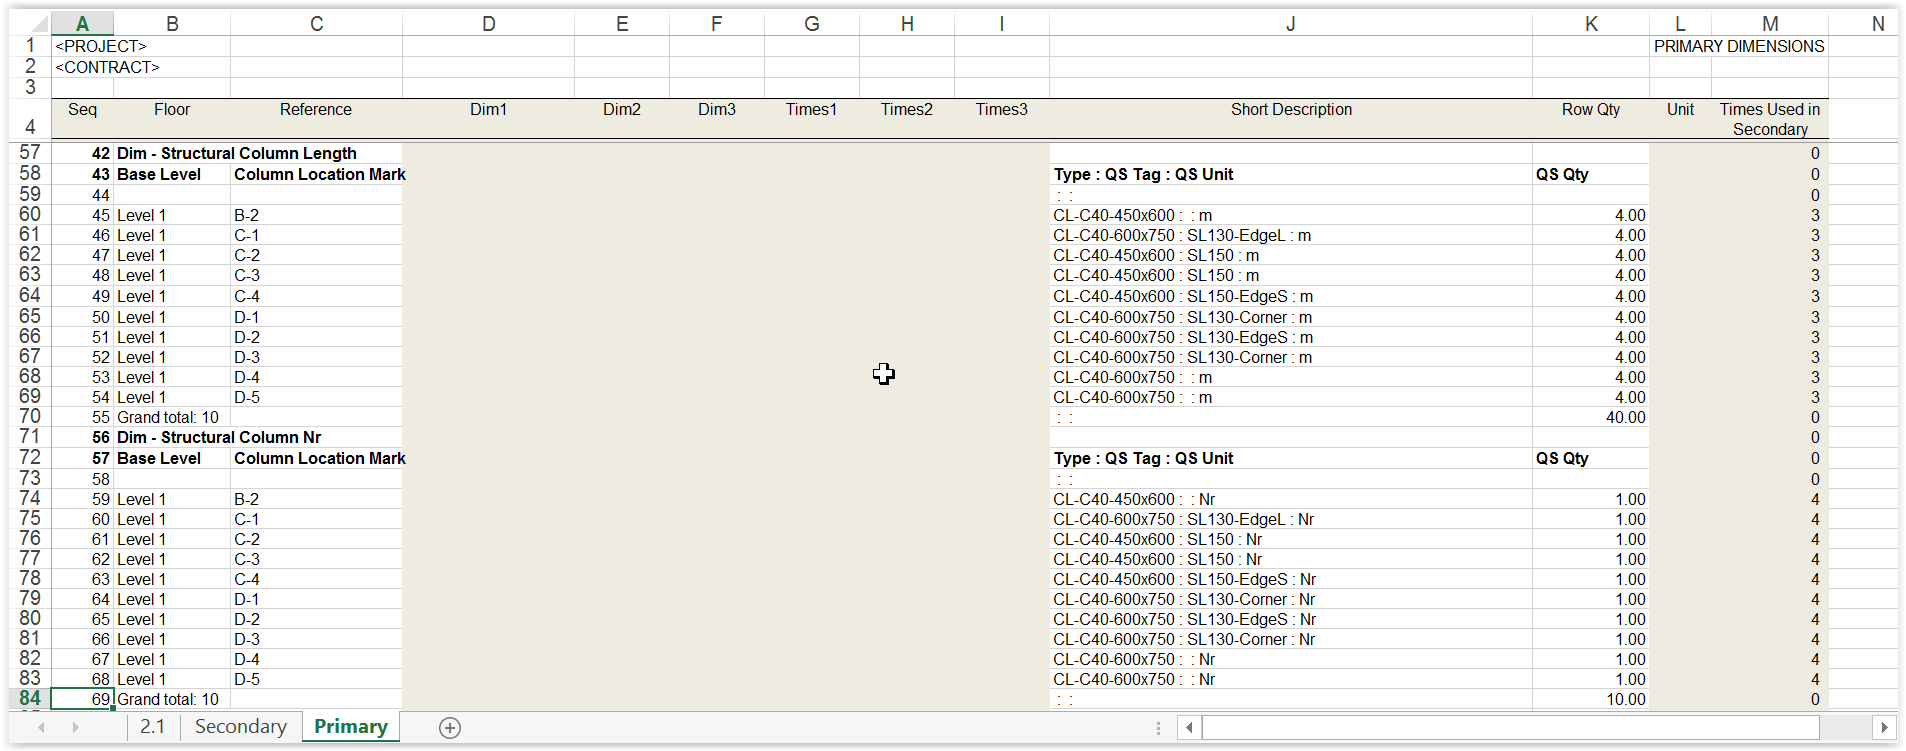
The item sequence can be kept unchanged for easy referencing, or may be sorted temporarily.
The Seq column helps re-sort them back to the original sequence.
Highlighted columns are not used for data exported from Revit Schedules because they are reserved for direct measurement at the upper region of the worksheet, where the formula used for Row Qty, say at Row 6, is =PRODUCT(E6:J6), meaning product of Dim1 …. Times3:

Secondary worksheet
Column A only of the “QS Desc” worksheet shown above is copied to Column B in the lower region of a “Secondary worksheet”:
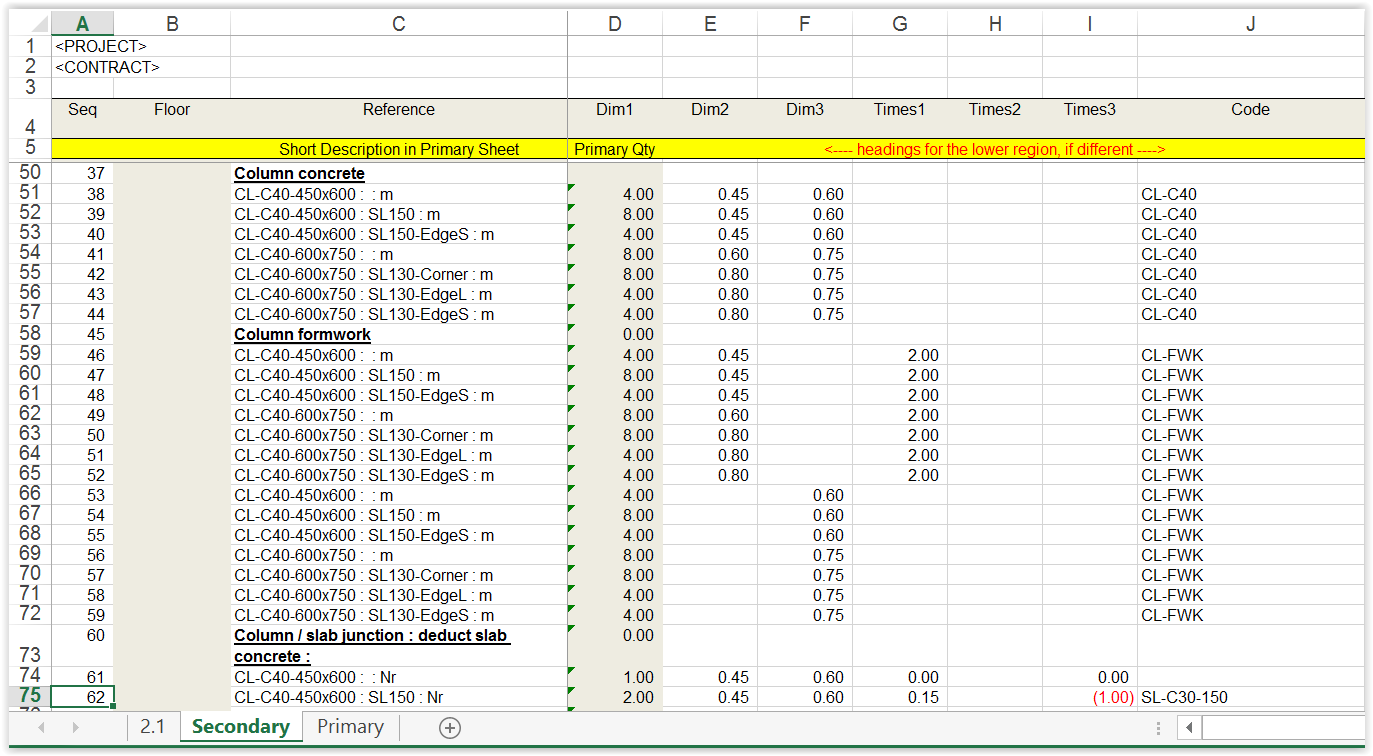
right portion:
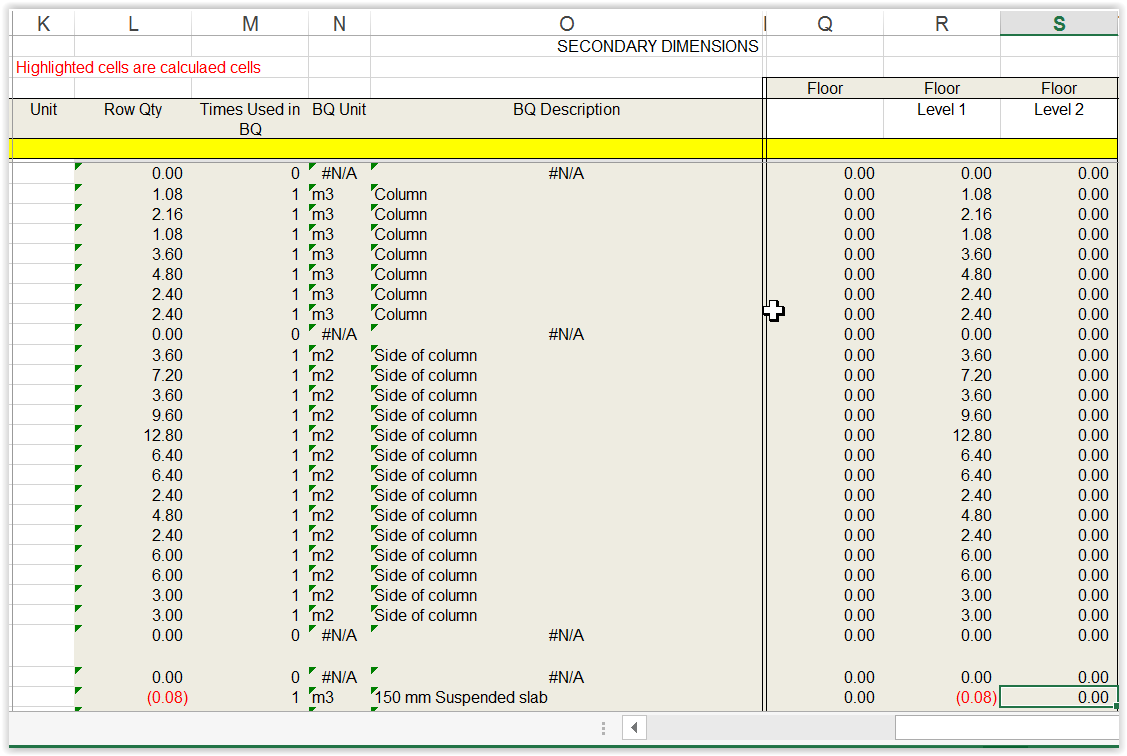
The upper region of the Secondary worksheet is similar to the upper region of the Primary worksheet for direct measurement which can straightly go to the Estimate or BQ without further processing like the lower region:
`
Further processing of the Primary Qty is done in the lower region.
By using a special formula in Column D in the lower region, each of the Primary Qty here is the total of the Primary Qty of the same QS Desc in the Primary worksheet.
There is no need to sort and group the lines in the Primary worksheet in order to give group total per each QS Desc.
The special formula is actually very simple.
For example,
- The Primary Qty at Row 14 is: =SUMIF(Primary!$J$5:$J$181;$C14;Primary!$K$5:$K$181)
- where $C14 is the QS Desc on the same row,
- Primary!$K$5:$K$181 is the range of QS Desc in the Primary worksheet, and
- Primary!$J$5:$J$181 is the range of Row Qty in the Primary worksheet.
- If the QS Desc in the Primary worksheet matches the QS Desc in the Secondary worksheet,
- then add in the corresponding Row Qty in the Primary worksheet.
The Code will be the code of the Estimate or BQ items.
Again, the Row Qty is the product of all Dims and Times of the same row, using the “=PRODUCT()” function.
They are also called Secondary Qty.
The columns like Times Used in BQ, BQ Unit, BQ Descriptions are making reference to the Estimate or BQ worksheet for error checking.
The Floor columns are for analysis of quantities by floors.
Estimate or BQ worksheet
The Estimate or BQ worksheet is like this:
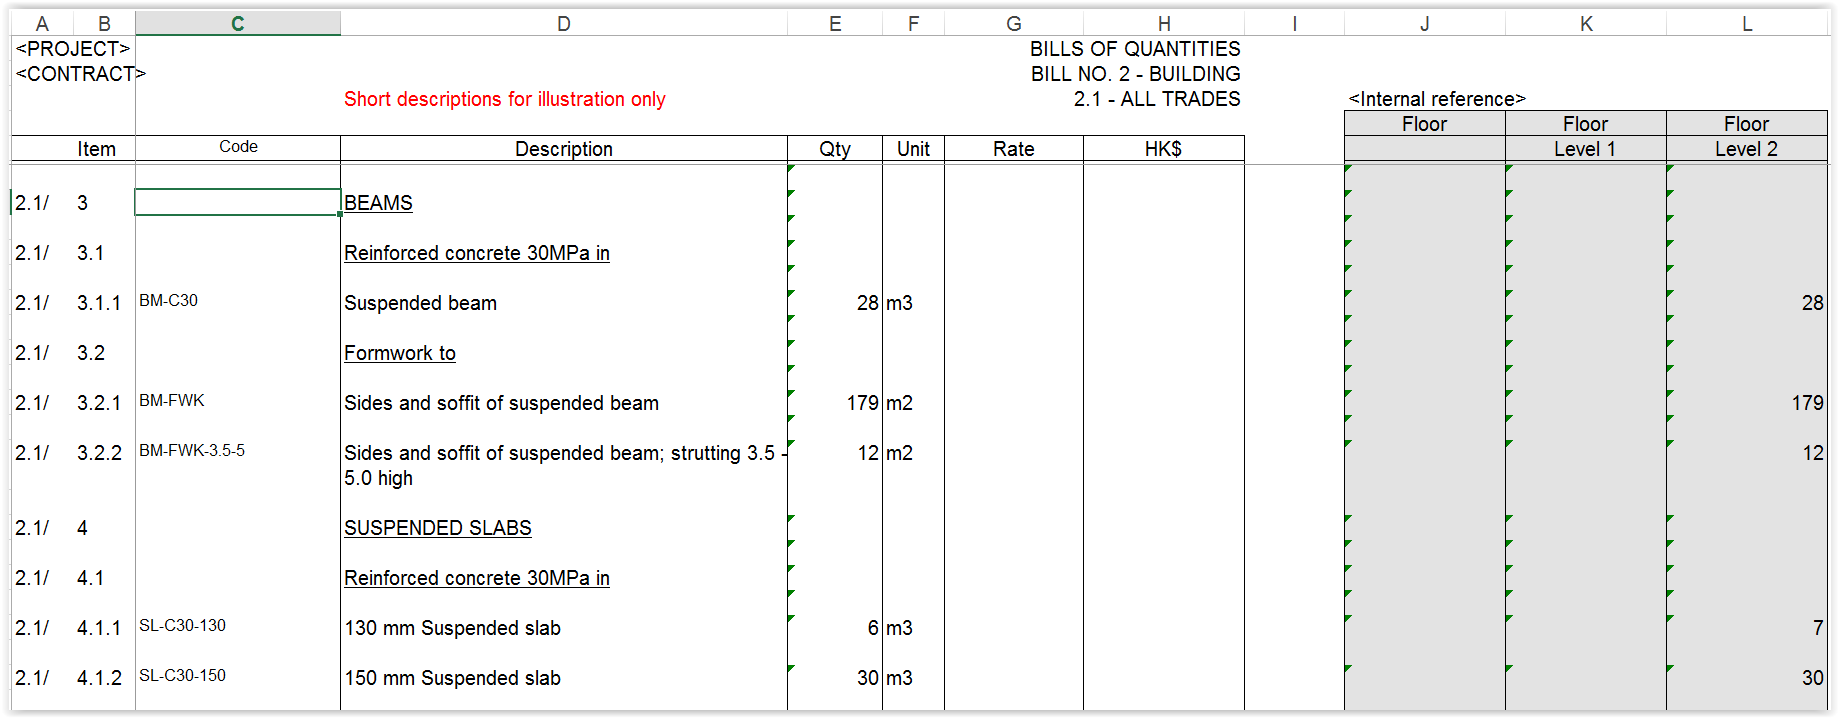
Similar to the Primary Qty or the Secondary worksheet, by using a special formula, each of the Qty here is the total of the Secondary Qty of the same Code in the Secondary worksheet.
The special formula is in the form of:
- =ROUND(SUMIF(Secondary!$J$6:$J$176;$C41;Secondary!$L$6:$L$176);0)
Basically, it means that if the Code in the Secondary worksheet matches the Code in the Estimate or BQ worksheet, then add in the corresponding Row Qty in the Secondary worksheet.
The Floor columns are for internal references only.
When issuing the Estimate or BQ in Excel softcopy, the formulae should be changed to values and other internal reference data should be removed with the empty columns hidden.
Setting Revit Schedules
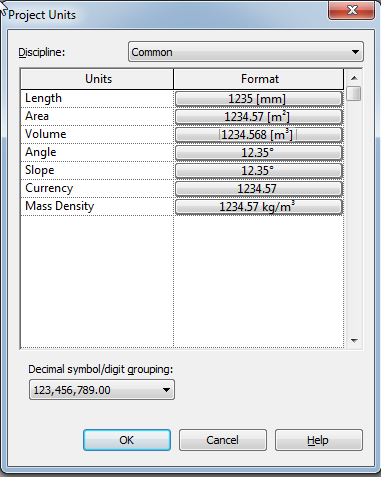
Project units
Revit schedules show the units against numerical values by default.
It would not be convenient if the numerical values are exported to Excel worksheet for further calculations because they would not be recognised as numerical values unless the units are removed
A solution would be to define two decimal places for Area and three decimal places for Volume with the units hidden, so as to make them self-explanatory without the need of units.
To define the project units (in metric): click Manage > Project Unit icon:
Parameters
Parameters provided by Revit are called system parameters, which cannot be changed though some permit entry of values.
There are two types of parameters which one can define at the Family, Type or Instance level:
- Project Parameters: can appear in schedules but not in tags, but cannot be shared by other projects and families.
- Shared Parameters: can appear in schedules and tags, shared by multiple projects and families, and exported to ODBC.
Shared Parameters are more versatile and useful.
For some Families and Types, a shared parameter can be added to the properties directly.
However, for others, only project parameters can be added to the properties, but a project parameter can borrow a shared parameter, so the shared parameter can still be used but indirectly.
Project parameters
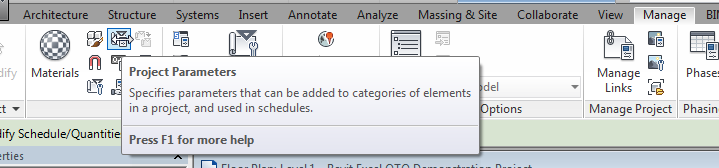
To add project parameters: select Manage > Settings > Project Parameters:
Note from the above that either a project parameter or a shared parameter can be added.
Shared parameters
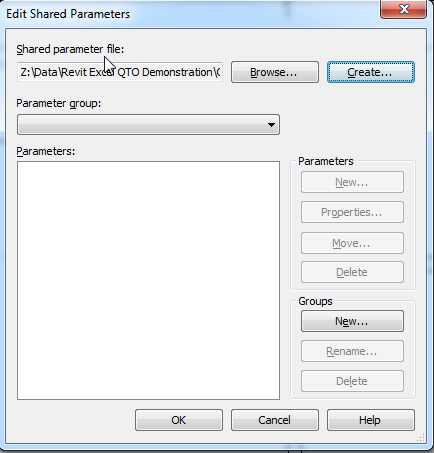
To add shared parameters: select Manage > Settings > Shared Parameters:
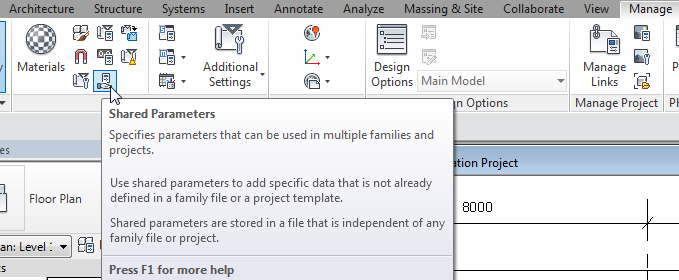
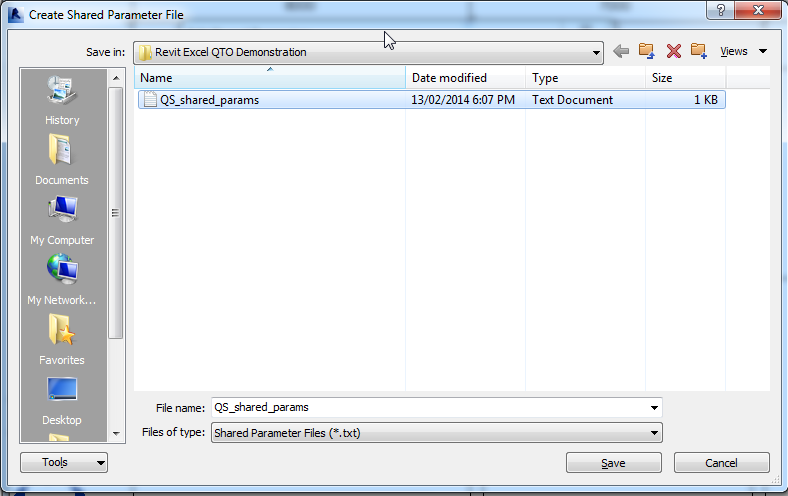
Select Create, go to a convenient folder, name a Shared Parameter file, e.g. "QS_shared_params", which is a txt file, save and return back to the screen on the left:
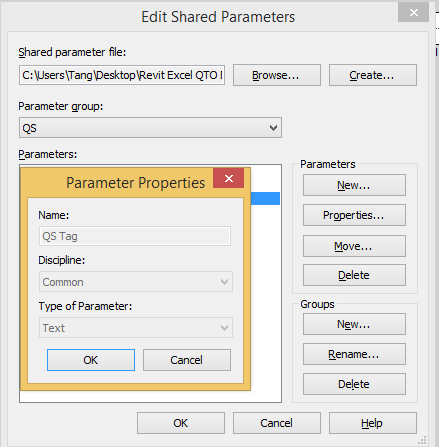
Select New under Group, name a New Parameter Group, e.g. "QS", and select OK.
Select New under Parameters, name a new parameter, e.g. “QS Tag”, select Common under Discipline, select Text under Type of Parameter, and select OK:
Defining schedule columns
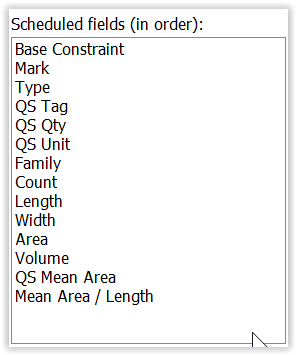
Revit schedule columns (fields) can be selected from “Available fields” (parameters).
If there are no suitable fields available, new columns can be defined either by “Add Parameter” or “Calculated Value”:
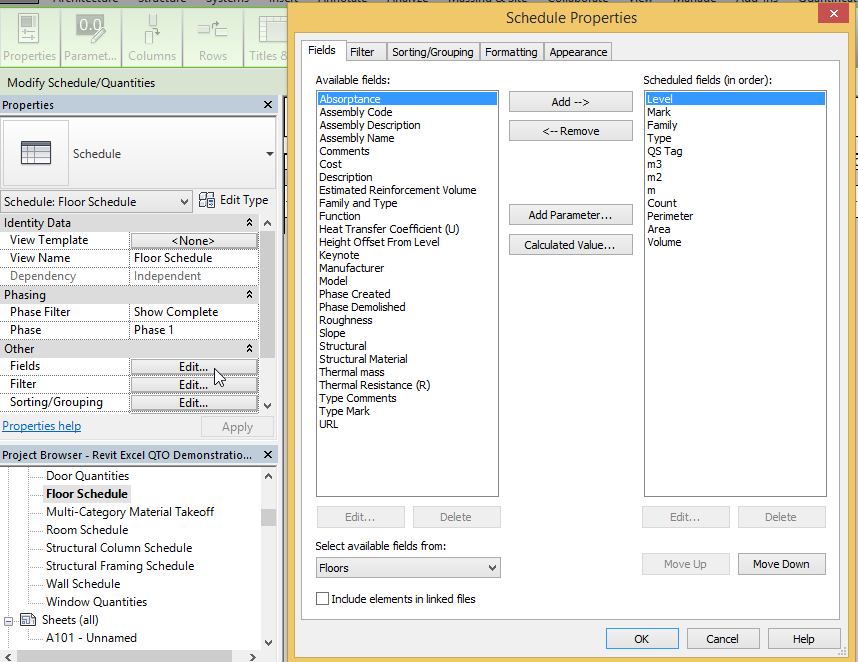
Level and Mark
Level and Mark parameters are generally available with elements.
Type
Elements are classified by Family and generally have a Type parameter available for use in the schedules.
However, instead of using Family and Type as provided by Revit, short-code-like-descriptions are used for Type.
To simplify matters, such descriptions should represent both the information of Family and Type.
QS Tag
QS Tag is a new parameter specially added to supplement the information of “Type”.
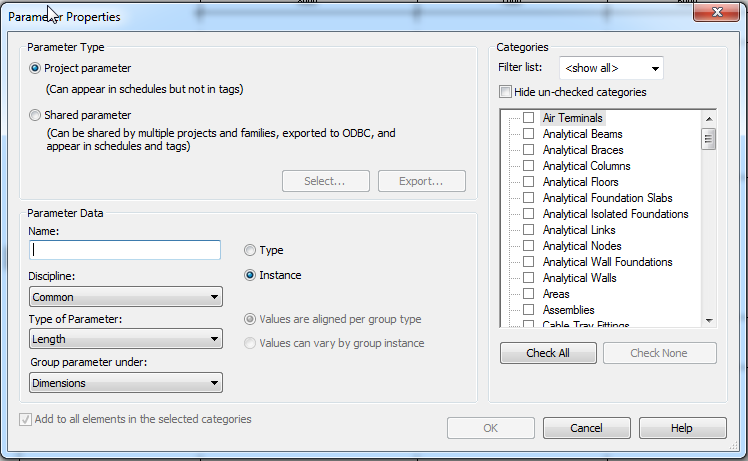
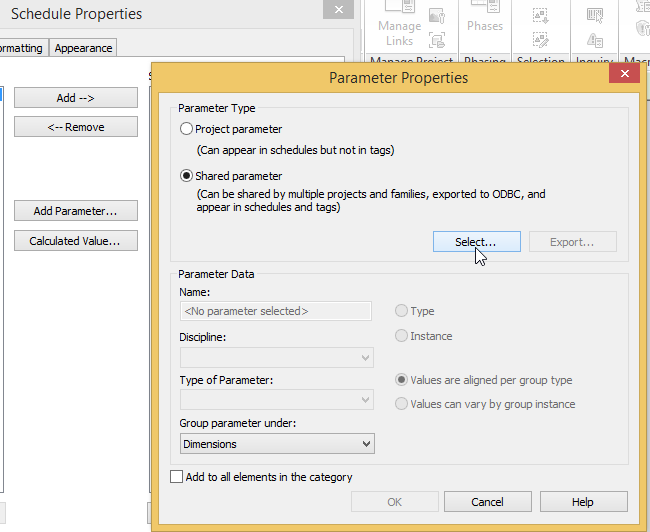
Select Add Parameter as shown above to open the Parameter Properties window.
Select Shared parameter > Select to open another window.
Select the Parameter Group QS if it already exists, otherwise create it as described for Shared Parameters.
Select QS Tag if it already exists, otherwise create it as described for Shared Parameters by selecting Edit.
Select OK to go back to the Parameter Properties window.
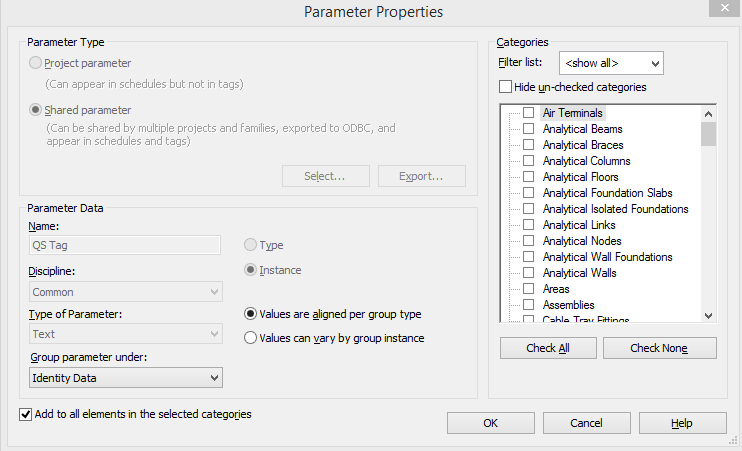
Check “Add to all elements in the selected categories” and Instance.
Select Identity Data under “Group parameter under”, and select OK.
Move up the newly created parameter on the menu to the desired position.

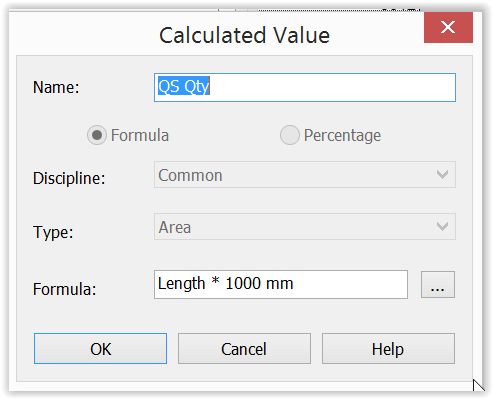
QS Qty and QS Unit
QS Qty is a calculated field borrowing its value from other parameters like Count, Length, Area, Volume, etc.
The unit of QS Qty can be Nr, m, m2, m3, i.e. a mixture.
However, Revit does not permit a column of such mixed nature.
Since QS Qty should have 2 decimal places, therefore, it is artificially defined as an Area parameter which according to the setting of the Project Units described earlier will show 2 decimal places.
However, tricks have to be done as shown below to make their numerical values still correct even though they are recognised by Revit as Area parameters:
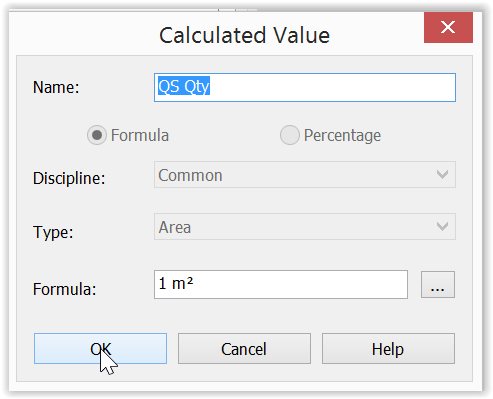
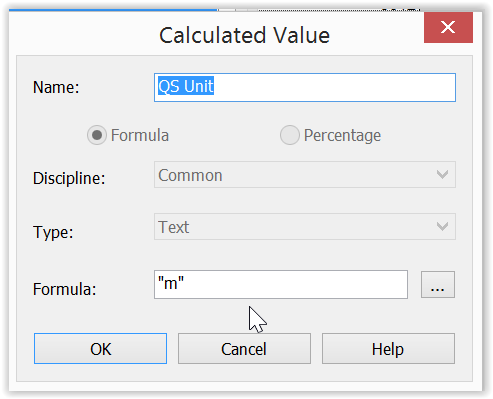
QS Unit is a calculated field specially used to tell the real unit of QS Qty. The formulae are simply “m” for “m”, “m2” for “m2”, “m3” for “m3”, “Nr” for “Nr”, etc.
It may be possible for some elements that we need their Count, Length, Area as QS Qty, e.g. Column Nr and Column Length, Wall Area and Wall Length. To handle this, the same schedule can be duplicated only with the QS Qty and QS Unit suitably adjusted to suit while all other fields can be kept the same.
Example schedules
Wall schedules
A Wall Area schedule gives wall areas as QS Qty for the generation of concrete volume and formwork area:

A Wall Length schedule gives wall lengths as QS Qty for the processing of quantities at junctions with slabs:
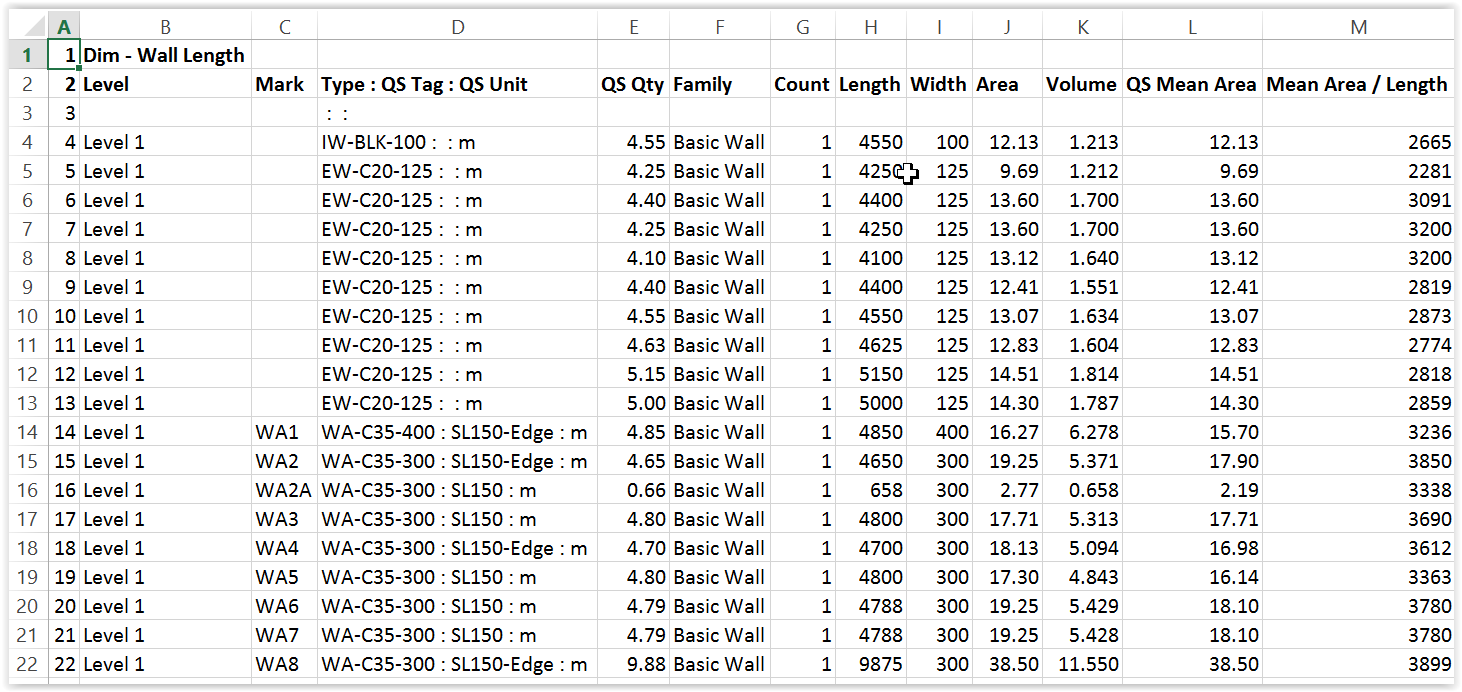
Level is actually the base constraint renamed in the schedule heading. This is not absolutely necessary for billing purposes.

QS Tag is for entering information like the slab thickness and whether the wall is at slab edge to facilitate adjustment for slab and wall junctions.
Length, Width (i.e. thickness), Area and Volume are system parameters.
Note that Area is not always equal to the elevation areas along the centre line as explained later and would need special treatment.
Wall height is not available probably because the height can vary for a wall.
Lengths at wall ends are not available.
This is to be resolved.
Lengths around openings are not available.
This is to be resolved through giving more information on the Door and Window Schedules.
For blank openings, this is still to be resolved.
QS Mean Area is equal to Volume / Width.
“Mean Area / Length” is equal to QS Mean Area / Length.
Representation of wall length, area and volume
Note the wall length, area and volume have the following representations:
|
|
Wall length given |
Area given |
Volume given |
|---|---|---|---|
|
Straight wall e.g. |
Centre line of wall = |
Elevation area on one face = 12 x = |
Area along centre line x wall thickness = 12 x 4 x = |
|
Wall L-shaped on plan with mitre joint e.g. |
Centre line of wall with the corner shared between the two wings = 7.85 + = |
Elevation area based on the extreme length of each wing = 8 x 4 + 5 x = 32 + = |
Area along centre line with the corner shared x wall thickness = 7.85 x 4 x 0.4 + 4.80 x 4 x 0.3 = 12.56 + = |
|
Wall L-shaped on plan with butt joint e.g. |
Same as above |
Elevation area based on the self length of each wing = 8 x 4 + 4.6 x = 32 + = |
Area based on self length x wall thickness = 8 x 4 x 0.4 + 4.6 x 4 x 0.3 = 32 x 0.4 + 18.4 x 0.3 = 12.80 + = |
|
Wall L-shaped on plan with butt joint e.g. |
Same as above |
Elevation area based on the self length of each wing = 7.7 x 4 + 5 x = 30.8 + = |
Area based on self length x wall thickness = 7.7 x 4 x 0.4 + 5 x 4 x 0.3 = 30.8 x 0.4 + 20 x 0.3 = 12.32 + = |
|
Wall T-off from another wall e.g. 4.6 x
|
Centre line of T-off wall measured to centre line of main wall = 4.6 + 0.2 = |
Elevation area based on the self length of T-off wall = 4.6 x = |
Area based on self length x wall thickness = 4.6 x 4 x 0.3 = |
The Area and Volume do not make deduction at the junction with floor slab.
Whether the L-shaped wall is mitre or butt jointed, it does not make any difference to the Volume, but the Areas are different for the three cases.
The area of formwork to sides of wall should be equal to the elevation area along the centre line x height x 2 = (7.85 + 4.8) x 4 x 2 = 50.6 m2 x 2.
The Areas given by Revit for the three cases of L-shaped wall are useless for this purpose.
Wall junctions on plan:
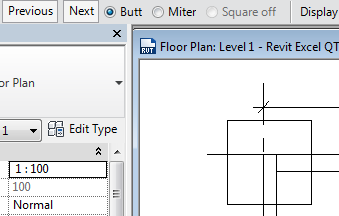
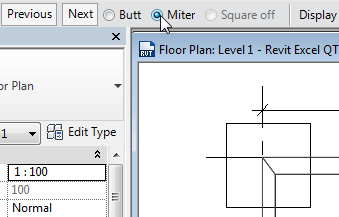
- It is preferred to use mitre joints at corner junction of walls.
- To change the type of wall junctions on plan: select a wall > Wall Joins:
- Select Butt to give a butt joint:
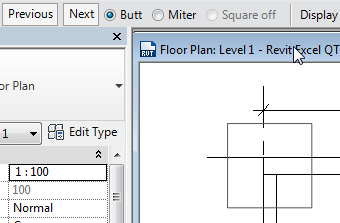
- Select Previous or Next to change the direction of the joint:
- Select Miter for a mitre joint:
After all these discussions, it seems that Volume is a more reliable value to use than Area.
Therefore, QS Qty using Wall Area for Estimate and BQ purposes takes the value of Volume / Width, i.e. the QS Mean Area.
QS Qty using Wall Length is to be used for adjustments for the wall and slab junction, it appears that Length is not accurate enough but close enough and is the only choice available. It is to be addressed.
Architectural walls
Architectural walls can be modelled just like a structural wall.
However, unlike structural walls which can be taken as going up to the floor level because they usually have stronger concrete grade, architectural walls should go up to beam or ceiling soffit only and not the floor level.
Revit does not have a feature to let architectural walls automatically go up and stop there.
Therefore, architectural walls have to be modelled one by one to ensure correct height.
With so many architectural walls within a building, this is a time consuming process and is therefore prone to errors.
A solution is to model architectural walls like structural walls up to the floor level above, and select the Join > Switch Join function so that the slabs and beams will override the walls so that the wall volumes and areas reported will be those below the slabs or beams.
Floor slab and structural wall junctions
When modelling, after selecting a floor slab >
 >
>  > Yes, the following dialogue will appear and will only appear if there are structural walls underneath the slab:

If “Yes” is selected, the volume of the structural walls below will be measured to the underside of the slab, as shown for the wall on the left below.
If “No” is selected, the volume of the structural walls below will be measured to the top of the slab, as shown for the wall on the right below, but the reported volume of the slab will not be reduced.
The reported height of the structural walls when defined to be to the top of the slab will not be changed in both cases.
In theory, when a structural wall is attached to the bottom of a floor slab, the wall top will move when the floor slab is moved up or down.
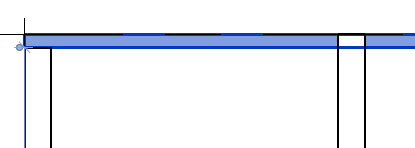
Furthermore, the Modify Wall menu also has the following choices:
However, the behaviour after attaching or detaching walls using the above slab or wall commands is not quite definite every time.
Furthermore, since the slab and wall junctions will need to be adjusted in any case, when encountering the above dialogue when editing slab boundary, it is better to answer “No” to retain the default treatment.
Structural column schedules
A Structural Column Length schedule gives column lengths as QS Qty for the generation of concrete volume and formwork area:

A Structural Column Number schedule gives column numbers as QS Qty for the processing of quantities at junctions with slabs:

Column Location Mark is a system parameter which gives the grid line references.
This is used here instead of the usual Mark.
QS Tag is for entering information like the slab thickness and whether the column is an edge or corner column to facilitate adjustment for slab and column junctions.
For a column defined to be of floor to floor height, Volume is a system parameter which gives the volume of concrete below slab, while Length is a system parameter which gives the floor to floor height.
Since the floor to floor height is needed, therefore “QS Qty” takes the value of Length for Column Length schedule.
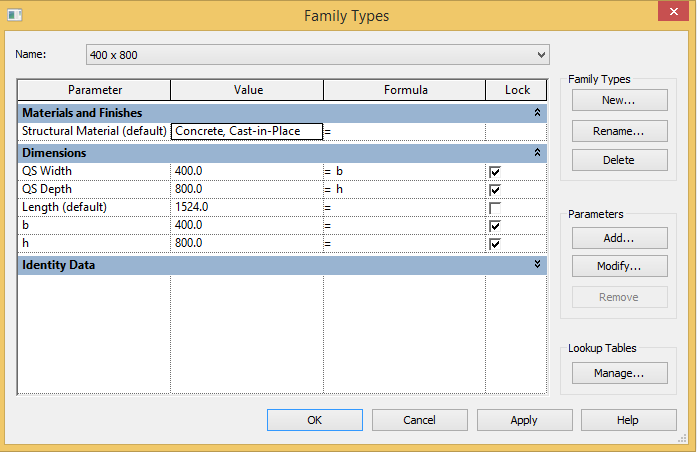
It is strange that the column width (b) and depth (h) are not available to the properties window and schedules.
Therefore, two shared parameters QS Width and QS Depth have been added to the Family Type parameters to make them available to the schedules to facilitate error checking.
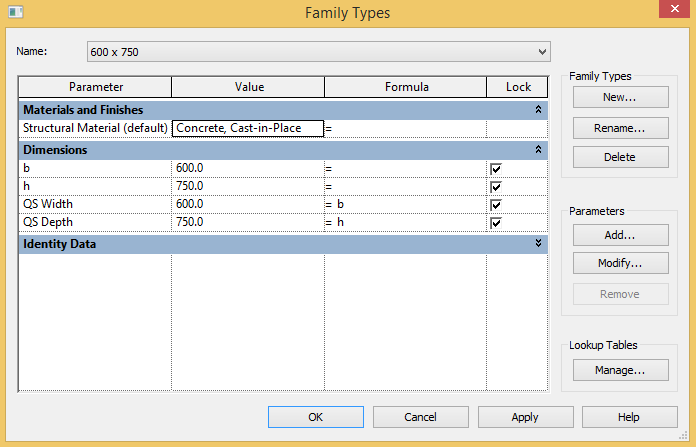
QS App Slab Tk = Length - Volume / (QS Width * QS Depth) which is useful for indicating the approximate slab thickness for counter-checking any errors in positioning the columns.
Vol / (Wi x Dp) = Volume / (QS Width * QS Depth) gives the length of column below slab.
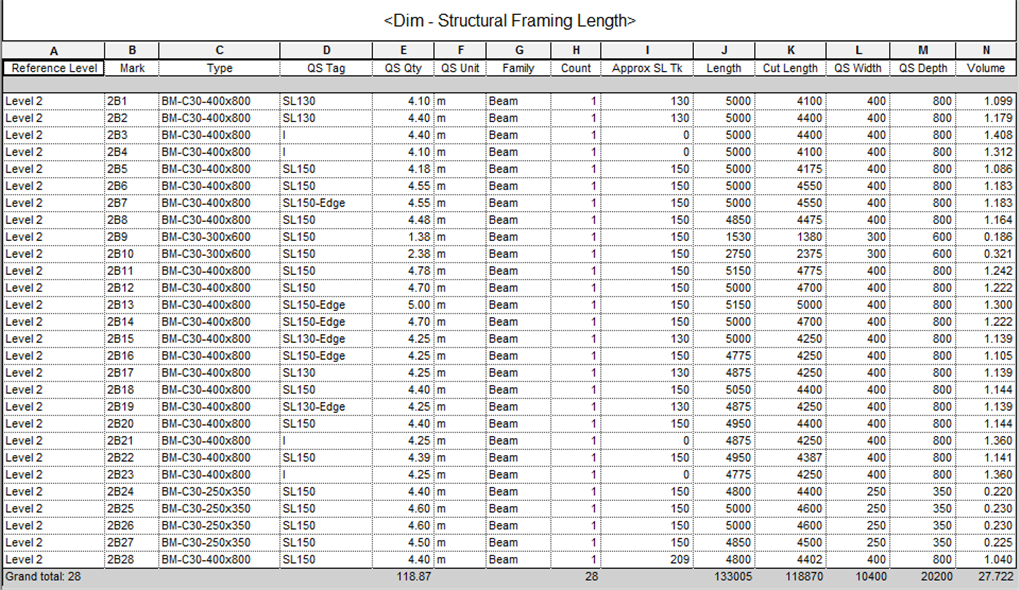
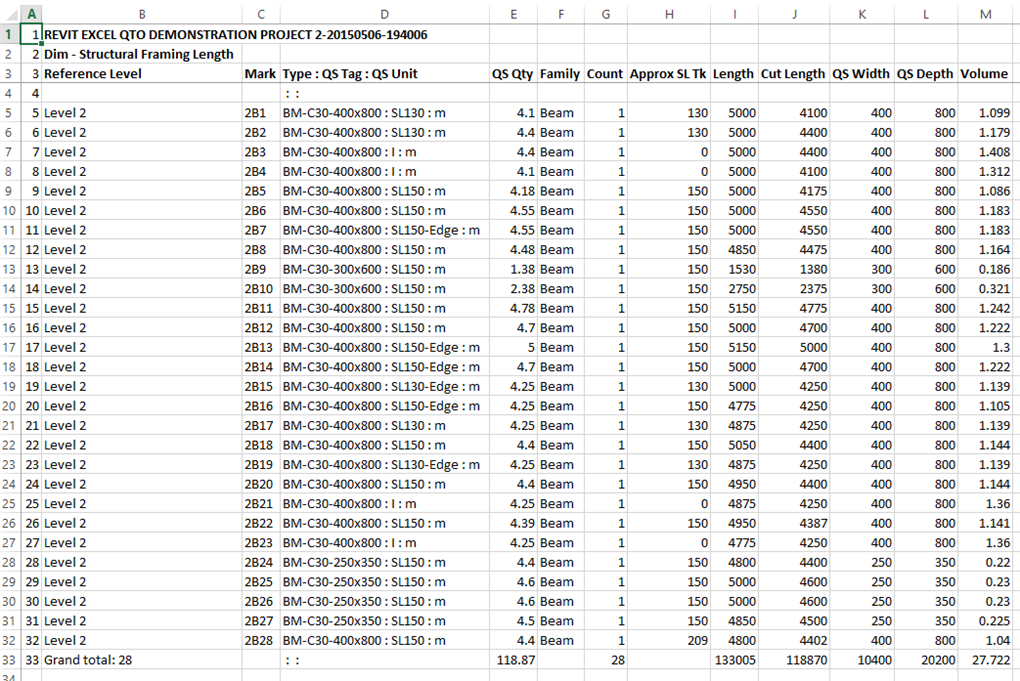
Structural framing length schedule
Structural Framing Length schedule is basically a beam length schedule:

For beams, there are two parameters of Length and Cut Length.
Only the Cut Length is the length between supporting columns or walls.
QS Qty for Beam Length takes the value of Cut Length.
Similar to structural columns, the beam width (b) and depth (h) are not available to the properties window and schedules.
Therefore, two shared parameters QS Width and QS Depth have been added to the Family Type parameters to make them available to the schedules to facilitate error checking:
Floor slab area schedule
A Floor Slab Area schedule can be:

QS Tag is for the entry of information about the strutting height.
QS Qty takes Area.
Door and window schedules
A Door Number schedule can be:
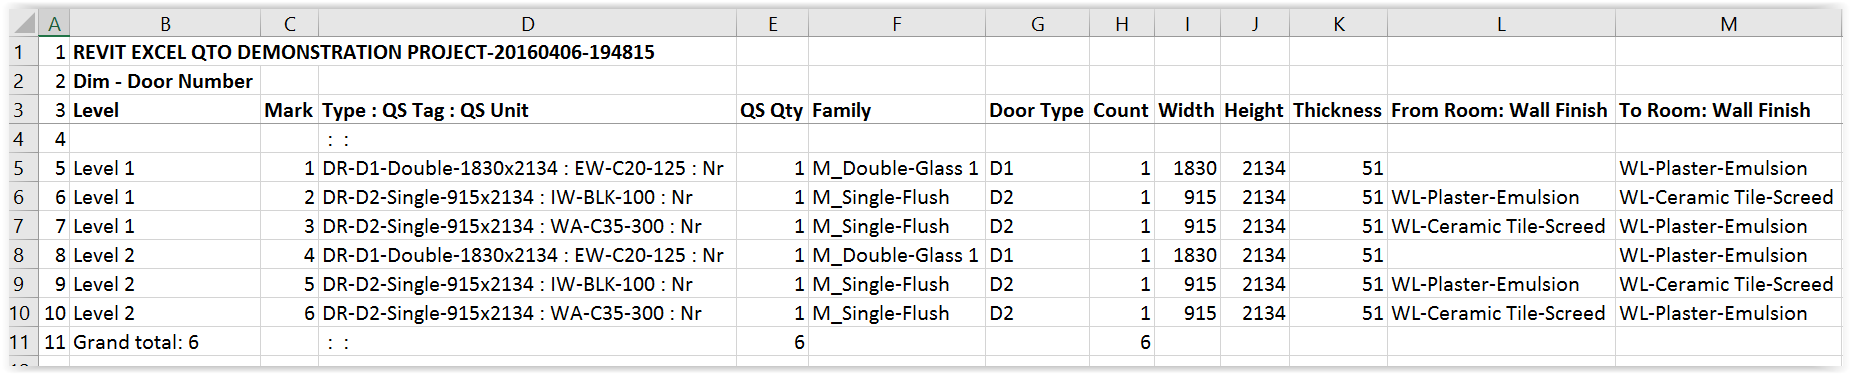
The values of “From Room : Wall Finish” and “To Room : Wall Finish” are obtained with the help of a self-written macro to facilitate adjustment of wall finishes on both sides of the windows.
A Window Number schedule can be:
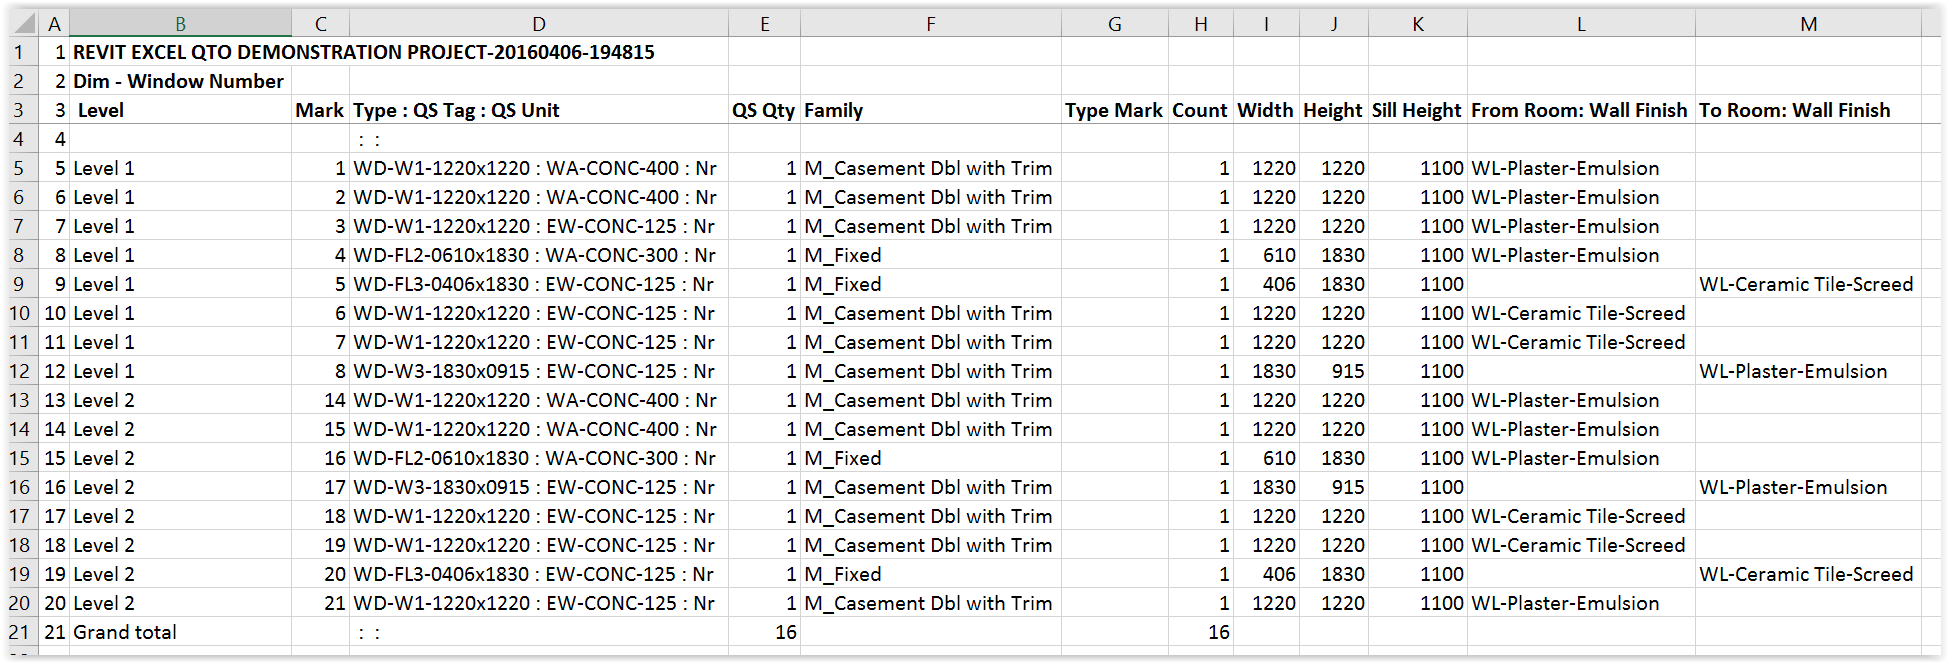
QS Tag is for the entry of information about the walls housing the doors and windows to facilitate future measurement of formwork to jambs and soffit, boxing and lintels.
Room schedules
The default room schedules provided by Revit can give Floor Area and Perimeter, but not the Nett Ceiling and Beam surface areas, nor wall and column surface areas:

By defining the floor level above a room as the Upper Limit, and entering the slab thickness in negative value as the Limit Offset, the reported Unbounded Height will give the floor to ceiling soffit height, which should be good for generating the wall and column surface areas.
Adjustment would need to be made for the beam surfaces and end junctions.
Adjustment for window and door openings may be taken care of when processing the window and door quantities.
To provide QS Qty for floor, wall, ceiling and skirting, 4 separate schedules are adapted from the Room Schedule.
Room Floor Finishes Area schedule:

Room Ceiling Finishes Area schedule:

Room Wall Finishes Area schedule, with skirting area to be deducted from wall area:

Room Perimeter Length schedule, for skirting:

Room elements do not have a Type parameter.
A calculated field has been created for Type, which takes the names of the finishes as its values.
Conclude
Having set up the Revit schedules and the corresponding Excel worksheets once, they can be re-used as a set of templates for other Revit models.
The number of chains of QS Desc --> secondary calculations --> Codes can be expanded as and when they are encountered and retained in the templates to serve future use to reduce the burden of re-defining every time.
Get into modelling which is easy and powerful as soon as possible.
Understand it, identify the limitations and suggest solutions to make it really productive.
Macro
A Macro to Export all Revit Schedules to a Single Excel File in One Go is given below.
Original Revit View Schedule
Exported to Excel Worksheet
with columns "Type", "QS Tag" and "QS Unit" combined as column D followed by column "QS Qty" as column E:
"All Dim" Worksheet
containing contents of all worksheets beginning with "Dim - ":
"QS Desc" Worksheet
containing all unique descriptions of "Type : QS Tag : QS Unit" with total "QS Qty"
Codes
Revit Macro KCTCL (20150524a).txt
/* Export All Revit Schedules to One Excel file
* Written by: K C Tang
* Using: SharpDevelop.
*
* Date last revised: 24/5/2015
* Revision notes: Handle errors when there are no "Dim - " schedules to
* fill the "All Dim" worksheet to serve as the source of
* the pivot table on the "QS Desc" worksheet.
* Handle errors when the folder is read only,
* such as a folder of the sample projects provided by Revit.
* Revision notes on 6/5/2015:
* Speed drastically increased (reduced to 1/4) by using Excel functions
* as much as possible instead of manipulating Excel file cell by cell.
* Pivot table used for "QS Desc" worksheet.
* Sheet header added.
* Frozen panes set.
* Page setup set.
* Revision notes on 19/1/2015:
* Bug fixing and general improvements.
* Date first released for use : 31/12/2014
* Notes: Export all Revit view schedules to one Excel file.
* Schedules with names beginning with "Dim - " will have:
* - columns "Type", "QS Tag" and "QS Unit" combined into one column;
* - column "QS Qty" moved to next to the combined column;
* - an "All Dim" worksheet created to contain all these schedules; and
* - a "QS Desc" worksheet created to contain unique list of "Type : QS Tag : QS Unit".
*
*/
// using libraries
using System;
using System.Collections;
using System.Collections.Generic;
using System.Linq;
using Autodesk.Revit.DB;
using Autodesk.Revit.DB.Architecture;
using Autodesk.Revit.UI;
using Autodesk.Revit.UI.Selection;
using Excel = Microsoft.Office.Interop.Excel;
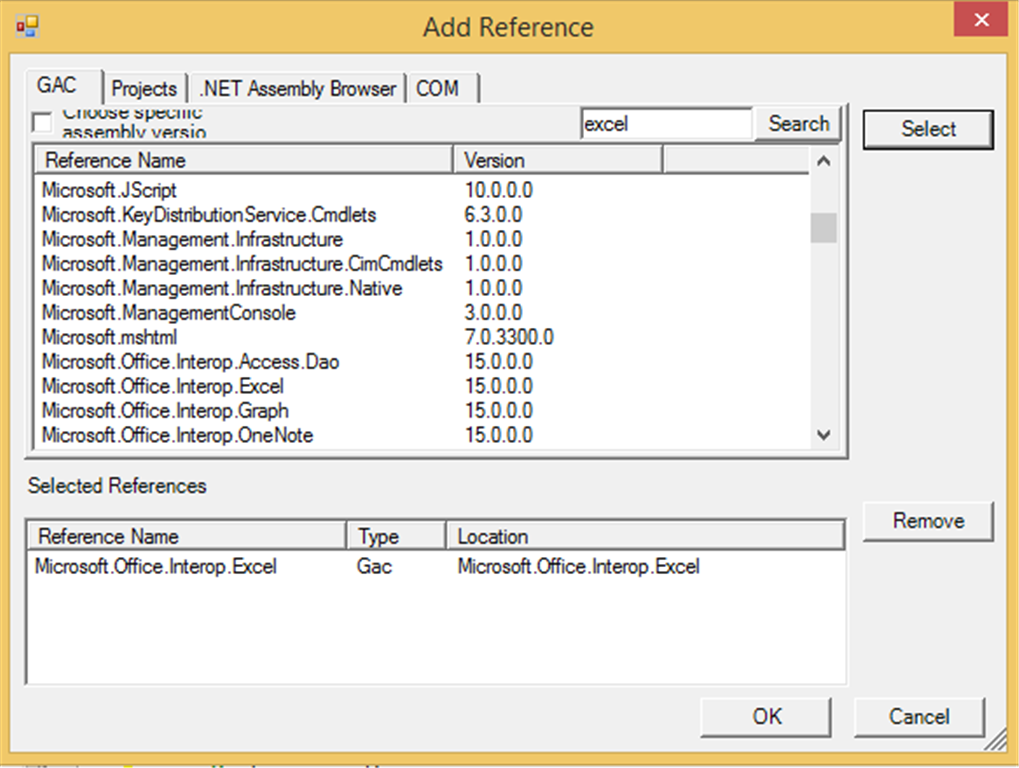
/* Microsoft.Office.Interop.Excel must be added separately
* by selecting SharpDevelop's menu: Project > Add References,
* and searching for it, then selecting it.
*/
namespace KCTCL
{
[Autodesk.Revit.Attributes.Transaction(Autodesk.Revit.Attributes.TransactionMode.Manual)]
[Autodesk.Revit.DB.Macros.AddInId("E77FD3DE-05E8-4FD3-B85A-116F5B6F2EEF")]
public partial class ThisApplication
{
private void Module_Startup(object sender, EventArgs e)
{
}
private void Module_Shutdown(object sender, EventArgs e)
{
}
#region Revit Macros generated code
private void InternalStartup()
{
this.Startup += new System.EventHandler(Module_Startup);
this.Shutdown += new System.EventHandler(Module_Shutdown);
}
#endregion
public void ExportAllSchedulesToOneExcel()
{
// all data names must be intialized first and have their types declared with type names before them
// define row number to insert column header
const int col_header_row = 3; // const int = integer constant type
// keep the starting time
DateTime time_start = DateTime.Now; // Datetime = datetime type
// select active Revit document
Document doc = this.ActiveUIDocument.Document; // Document = document type
// get filename from doc.Title
string filename_no_ext = doc.Title; // string = string type
// add ".rvt" temporarily to doc.Title not ending with ".rvt"
// because file explorer may have been set to hide the extension
if (!filename_no_ext.EndsWith(".rvt")) // ! = not
{
filename_no_ext = filename_no_ext + ".rvt"; // + = join text together
}
// get active folder name by removing the full file name
// from the full pathname which contains the full file name
string folder_name = doc.PathName.Replace(filename_no_ext, ""); // replace filename with nothing
// change file extension to the current datetime string
// to avoid overwriting existing files
filename_no_ext = filename_no_ext.Replace(".rvt",
DateTime.Now.ToString("-yyyyMMdd-HHmmss")); // line considered complete only if ending with ";"
// initilize Excel variables
Excel.Application xlApp;
Excel.Workbook xlWorkBook;
Excel.Worksheet xlWorkSheet;
Excel.Worksheet xlWorkSheetAllDim;
Excel.Range xlRange;
Excel.Range xlRange2;
Excel.QueryTable xlQuery;
xlApp = new Excel.Application();
// check whether Excel is installed
if (xlApp == null)
{
TaskDialog.Show("ExportAllSchedulesToOneExcel", "Excel is not installed!!");
return;
}
// define an object to represent default value
object default_value = System.Reflection.Missing.Value; // object = object type
// create new workbook, which by default contains at least 1 worksheet
xlWorkBook = xlApp.Workbooks.Add(default_value);
// initialize 2 worksheet variables, all referring to Sheet1 for the time being
xlWorkSheetAllDim = (Excel.Worksheet)xlWorkBook.Worksheets.get_Item(1);
xlWorkSheet = (Excel.Worksheet)xlWorkBook.Worksheets.get_Item(1);
// rename Sheet1 to contain contents of all future worksheets
// with names starting with "Dim - "
xlWorkSheetAllDim.Name = "All Dim";
// maximize workbook window
xlApp.ActiveWindow.WindowState = Excel.XlWindowState.xlMaximized;
// show menu bars
xlApp.Visible = true;
// read viewschedules in Revit active document
ViewScheduleExportOptions opt = new ViewScheduleExportOptions();
FilteredElementCollector collector = new FilteredElementCollector(doc).OfClass(typeof(ViewSchedule));
if (collector.ToElementIds().Count == 0) // == means compare for equality
{
TaskDialog.Show("ExportAllSchedulesToOneExcel", "No schedule available!!");
// close workbook without saving
xlWorkBook.Close(false, default_value, default_value);
xlApp.Quit();
// release objects
releaseObject(xlWorkSheet);
releaseObject(xlWorkSheetAllDim);
releaseObject(xlWorkBook);
releaseObject(xlApp);
return;
}
// sort elements in collector in ascending order
IOrderedEnumerable< ViewSchedule > sorted_collector =
from ViewSchedule view_schedule in collector orderby view_schedule.Name ascending select view_schedule;
// process schedule in ascending order
int all_dim_new_row = 0;
foreach (ViewSchedule view_schedule in sorted_collector)
{
// check if schedule name too long
if (view_schedule.Name.Length > 31 )
{
TaskDialog.Show("ExportAllSchedulesToOneExcel",
view_schedule.Name + "\n" + "Schedule name should not be more than 31 characters!!");
// release objects
releaseObject(xlWorkSheet);
releaseObject(xlWorkSheetAllDim);
releaseObject(xlWorkBook);
releaseObject(xlApp);
return;
}
}
foreach (ViewSchedule view_schedule in sorted_collector)
{
if (view_schedule.Name.StartsWith("<"))
{
// skip schedule with name beginning with "<", such as "<Revision Schedule>"
} else
{
// reduce filename length longer than 31
if (31 < view_schedule.Name.Length )
{
view_schedule.Name = view_schedule.Name.Substring(0, 14) + " name length > 31";
}
// replace special character with "_"
view_schedule.Name = view_schedule.Name
.Replace( ':', '_' )
.Replace( '*', '_' )
.Replace( '?', '_' )
.Replace( '/', '_' )
.Replace( '\\', '_' )
.Replace( '[', '_' )
.Replace( ']', '_' );
// export schedule to txt file
try {
view_schedule.Export(folder_name, filename_no_ext + ".txt", opt);
} catch (Exception) {
TaskDialog.Show("Exporting view schedules",
"Errors occurred -\n" +
"possibly the folder is read only\n" +
"e.g. in the case of sample projects provided by Revit,\n" +
"save the project to another folder first.\n\n" +
"Close to exit program.");
// release objects
releaseObject(xlWorkSheet);
releaseObject(xlWorkSheetAllDim);
releaseObject(xlWorkBook);
releaseObject(xlApp);
return;
}
// add a worksheet
xlWorkSheet = (Excel.Worksheet)xlWorkBook.Worksheets.Add(default_value);
// move it to become the last worksheet
xlWorkSheet.Move(default_value, xlWorkBook.Worksheets[xlWorkBook.Worksheets.Count]);
// name worksheet as schedule name
xlWorkSheet.Name = view_schedule.Name;
// import txt file into worksheet starting at cell at column A, one row above col_header_row
xlQuery = xlWorkSheet.QueryTables.Add(
"TEXT;" + folder_name + filename_no_ext + ".txt",
xlWorkSheet.get_Range("A" + (col_header_row - 1)));
xlQuery.RefreshStyle = Excel.XlCellInsertionMode.xlInsertEntireRows;
xlQuery.Refresh(false); // false means refresh but not return until refresh is finished
xlQuery.Delete(); // delete the query
// input into All Dim worksheet for schedules with names starting with "Dim - "
if (view_schedule.Name.StartsWith("Dim - "))
{
// insert blank new column A
xlWorkSheet.get_Range("A1").EntireColumn.Insert();
// find Type, QS Tag and QS Unit columns
int col_Type = 0;
int col_QS_Tag = 0;
int col_QS_Unit = 0;
int col_QS_Qty = 0;
col_Type = xlColumnFindExact(xlWorkSheet, "Type", col_header_row);
col_QS_Tag = xlColumnFindExact(xlWorkSheet, "QS Tag", col_header_row);
col_QS_Unit = xlColumnFindExact(xlWorkSheet, "QS Unit", col_header_row);
// define cell formula of column A starting from col_header_row
xlRange = xlWorkSheet.Range["A" + col_header_row]; // source range to copy from
xlRange2 = xlWorkSheet.Range["A" + col_header_row, "A" + xlRowLast(xlWorkSheet)]; // target range to copy to
string range_formula = "=";
string colon = "&\" : \"&"; // which stands for quote &" : "& unquote
if (col_Type != 0)
{
range_formula += xlColumnAddress(col_Type) + col_header_row;
}
if (col_QS_Tag != 0)
{
range_formula += colon + xlColumnAddress(col_QS_Tag) + col_header_row;
}
if (col_QS_Unit != 0)
{
range_formula += colon + xlColumnAddress(col_QS_Unit) + col_header_row;
}
if (range_formula != "=")
{
xlRange.Formula = range_formula;
xlRange.AutoFill(xlRange2, Excel.XlAutoFillType.xlFillCopy);
}
// remove cell formula and leave value for the combined column A
xlRange2.Value2 = xlRange2.Value2;
// remove Type, QS Tag and QS Unit columns
col_Type = xlColumnFindExact(xlWorkSheet, "Type", col_header_row);
if (col_Type != 0)
{
xlRange = (Excel.Range)xlWorkSheet.Cells[1, col_Type];
xlRange.EntireColumn.Delete(default_value);
}
col_QS_Tag = xlColumnFindExact(xlWorkSheet, "QS Tag", col_header_row);
if (col_QS_Tag != 0)
{
xlRange = (Excel.Range)xlWorkSheet.Cells[1, col_QS_Tag];
xlRange.EntireColumn.Delete(default_value);
}
col_QS_Unit = xlColumnFindExact(xlWorkSheet, "QS Unit", col_header_row);
if (col_QS_Unit != 0)
{
xlRange = (Excel.Range)xlWorkSheet.Cells[1, col_QS_Unit];
xlRange.EntireColumn.Delete(default_value);
}
// move QS Qty column to column D, but if it is before column D,
// move to column E to compensate the shifting of columns after cut
col_QS_Qty = xlColumnFindExact(xlWorkSheet, "QS Qty", col_header_row);
if (col_QS_Qty < 4)
{
xlColumnMove(xlWorkSheet, col_QS_Qty, 5);
} else
{
xlColumnMove(xlWorkSheet, col_QS_Qty, 4);
}
// move combined column A to column C
xlColumnMove(xlWorkSheet, 1, 4);
// bold down to col_header_row
xlRange = xlWorkSheet.get_Range("A1", "A" + col_header_row);
xlRange.EntireRow.Font.Bold = true;
// copy whole worksheet to All Dim to the next new row
all_dim_new_row += 1;
xlWorkSheet.UsedRange.Copy(xlWorkSheetAllDim.get_Range("A"+all_dim_new_row));
all_dim_new_row = xlRowLast(xlWorkSheetAllDim);
} else
{
// bold down to col_header_row
xlWorkSheet.get_Range("A1", "A" + col_header_row).EntireRow.Font.Bold = true;
}
// delete txt file
System.IO.File.Delete(folder_name + filename_no_ext + ".txt");
}
}
// move it to become the first worksheet
xlWorkSheetAllDim.Move(xlWorkBook.Worksheets[1]);
// add and name a worksheet to contain unique QS Desc
xlWorkSheet = (Excel.Worksheet)xlWorkBook.Worksheets.Add(default_value);
xlWorkSheet.Name = "QS Desc";
// generate pivot table if "All Dim" has data rows
if (xlRowLast(xlWorkSheetAllDim) > col_header_row)
{
// define pivot table data source
xlRange = xlWorkSheetAllDim.get_Range("C" + col_header_row,"D" + xlRowLast(xlWorkSheetAllDim));
Excel.PivotCache xlPivotCache = xlWorkBook.PivotCaches().Add(Excel.XlPivotTableSourceType.xlDatabase, xlRange);
Excel.PivotTables xlPivotTables = (Excel.PivotTables)xlWorkSheet.PivotTables();
// define pivot table in the QS Desc worksheet
Excel.PivotTable xlPivotTable = xlPivotTables.Add(xlPivotCache, xlWorkSheet.Range["A2"], "QS Desc", default_value, default_value);
xlPivotTable.SmallGrid = false;
xlPivotTable.ShowTableStyleRowStripes = true;
xlPivotTable.TableStyle2 = "PivotStyleLight1";
Excel.PivotField xlPivotField = (Excel.PivotField)xlPivotTable.PivotFields("Type : QS Tag : QS Unit");
xlPivotField.Orientation = Excel.XlPivotFieldOrientation.xlRowField;
xlPivotTable.AddDataField(xlPivotTable.PivotFields("QS Qty"), "Sum of QS Qty", Excel.XlConsolidationFunction.xlSum);
}
// format QS Qty column
xlRange = xlWorkSheet.get_Range("B1");
xlRange.EntireColumn.NumberFormat = "#,##0.00";
// move it to become the first worksheet
xlWorkSheet.Move(xlWorkBook.Worksheets[1]);
// loop through all worksheets
int loop_A_Mx = xlWorkBook.Worksheets.Count;
for (int loop_A = loop_A_Mx; loop_A >= 1; loop_A--)
{
// get worksheet
xlWorkSheet = (Excel.Worksheet)xlWorkBook.Worksheets.get_Item(loop_A);
// freeze top rows
((Excel._Worksheet)xlWorkSheet).Activate(); // cast to Excel._Worksheet to avoid the ambiguity that "Activate" is also used as an event
xlWorkSheet.Application.ActiveWindow.SplitRow = col_header_row;
xlWorkSheet.Application.ActiveWindow.FreezePanes = true;
// insert new column A
xlWorkSheet.get_Range("A1").EntireColumn.Insert();
// assign column A with row number
int last_row = xlRowLast(xlWorkSheet);
xlWorkSheet.Cells[1,1] = 1;
xlRange = xlWorkSheet.get_Range("A1","A" + xlRowLast(xlWorkSheet));
xlRange.Font.Bold = false;
xlRange.DataSeries(default_value,
Excel.XlDataSeriesType.xlDataSeriesLinear,
Excel.XlDataSeriesDate.xlDay,
"1", default_value, default_value);
// autofit column widths
xlWorkSheet.Columns.EntireColumn.AutoFit();
// assign cell B1 with filename
xlWorkSheet.Cells[1,2] = filename_no_ext.ToUpper();
xlWorkSheet.get_Range("B1").Font.Bold = true;
// define page setup
xlWorkSheet.PageSetup.Orientation = Excel.XlPageOrientation.xlLandscape;
xlWorkSheet.PageSetup.PrintTitleRows = "$1:$" + col_header_row;
xlWorkSheet.PageSetup.LeftFooter = filename_no_ext;
xlWorkSheet.PageSetup.RightFooter = "&P/&N";
xlWorkSheet.PageSetup.Zoom = false; // needs to be false for FitToPagesWide to work
xlWorkSheet.PageSetup.FitToPagesTall = false; // need to be false for FitToPagesWide to work
xlWorkSheet.PageSetup.FitToPagesWide = 1;
}
// save workbook
xlWorkBook.SaveAs(folder_name + filename_no_ext,
default_value, default_value, default_value,
default_value, default_value,
Excel.XlSaveAsAccessMode.xlNoChange,
default_value, true, default_value,
default_value, true);
// release objects
releaseObject(xlWorkSheet);
releaseObject(xlWorkSheetAllDim);
releaseObject(xlWorkBook);
releaseObject(xlApp);
TaskDialog.Show("Export All Schedules To One Excel",
"Finished!" + "\nTime Spent " + DateTime.Now.Subtract(time_start).Seconds + " seconds");
}
private string xlCellAddress(int row, int col)
{
// change cell address from (100, 1) to (A100) style
string prompt = (row + "\n\t" + col + "\n\t");
if (row < 1 || row > 1048576)
{
TaskDialog.Show("Excel Row Number", "Error - must be within 1 - 1048576!!");
return null;
}
// append row number to alphabetical column reference
return xlColumnAddress(col) + row.ToString();
}
private string xlCellValue2(Excel.Worksheet w_s, int row, int col)
{
// return value of worksheet cell
Excel.Range xlRange = (Excel.Range)w_s.Cells[row,col];
if (xlRange.Value2 != null)
{
return xlRange.Value2.ToString();
} else
{
return "";
}
}
private string xlColumnAddress(int col)
{
// convert column number to alphabetical reference
if (col < 1 || col > 16384)
{
TaskDialog.Show("Excel Column Number", "Error - must be within 1 - 16384!!");
return null;
}
int remainder = 0;
string result = "";
for (int loop_A = 0; loop_A < 3; loop_A++)
{
// get remainder after division by 26
remainder = ((col - 1) % 26) + 1;
if (remainder != 0)
{
// match the remainder to alphabets A to Z where A is char 65
// precede the alphabet to the previous result
result = Convert.ToChar(remainder + 64).ToString() + result;
}
col = ((col - 1) / 26);
// do it three times
}
return result;
}
private int xlColumnFindExact(Excel.Worksheet w_s, string find_what, int which_row)
{
object default_value = System.Reflection.Missing.Value;
Excel.Range xlFound = w_s.get_Range(which_row + ":" + which_row);
xlFound = xlFound.Find(find_what, default_value,
Excel.XlFindLookIn.xlValues,
Excel.XlLookAt.xlWhole,
Excel.XlSearchOrder.xlByRows,
Excel.XlSearchDirection.xlNext,
false, default_value, default_value);
if (xlFound != null)
{
return xlFound.Column;
} else
{
return 0;
}
}
private void xlColumnMove(Excel.Worksheet w_s, int col_from, int col_to)
{
if ((col_from != 0) & (col_to != 0) & (col_from != col_to))
{
Excel.Range from_range = (Excel.Range)w_s.Cells[1,col_from];
Excel.Range to_range = (Excel.Range)w_s.Cells[1,col_to];
to_range.EntireColumn.Insert(Excel.XlInsertShiftDirection.xlShiftToRight, from_range.EntireColumn.Cut());
}
}
private int xlRowLast(Excel.Worksheet w_s)
{
// return last used row number of worksheet
return w_s.Cells.SpecialCells(Excel.XlCellType.xlCellTypeLastCell,Type.Missing).Row;
}
private void releaseObject(object obj)
{
try
{
System.Runtime.InteropServices.Marshal.ReleaseComObject(obj);
obj = null;
}
catch (Exception ex)
{
obj = null;
TaskDialog.Show("Excel file created","Exception Occurred while releasing object " + ex.ToString());
}
finally
{
GC.Collect();
}
}
}
}
Installation Procedures
Change Project Units
As described above.
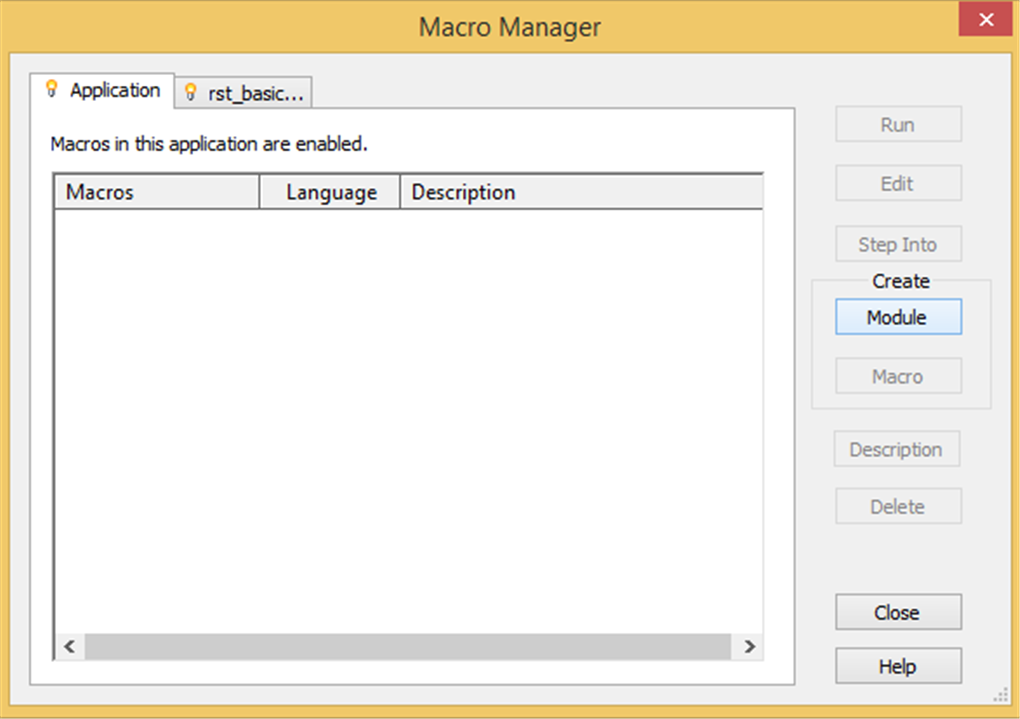
Open Macro Manager
Select Application Tab
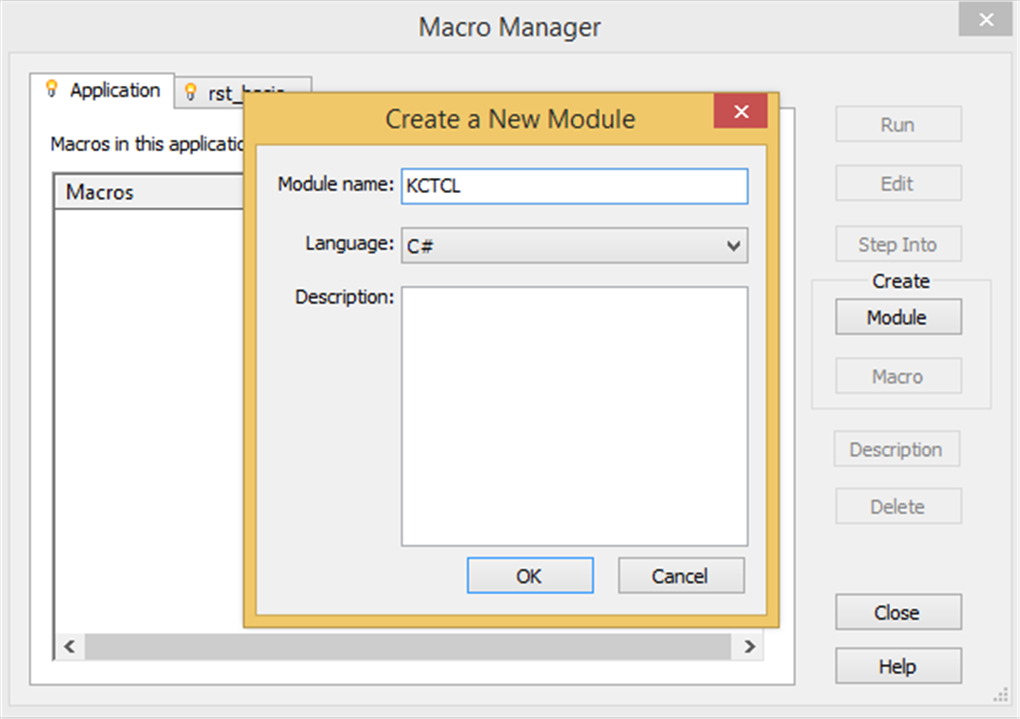
Create C# Module called "KCTCL" (all in capital letters)
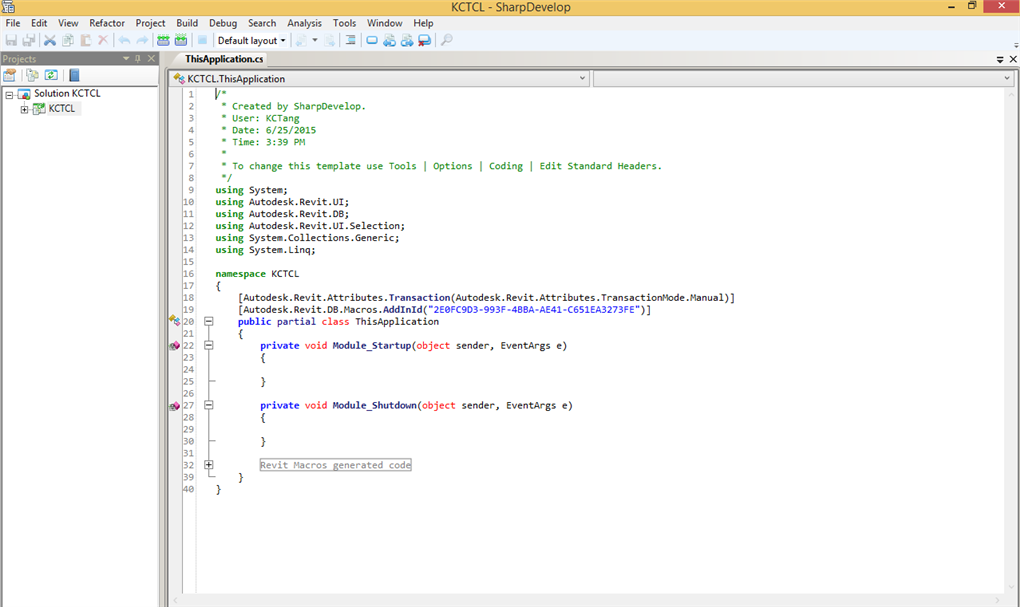
Default codes provided
Copy and paste the Codes above
Add Reference
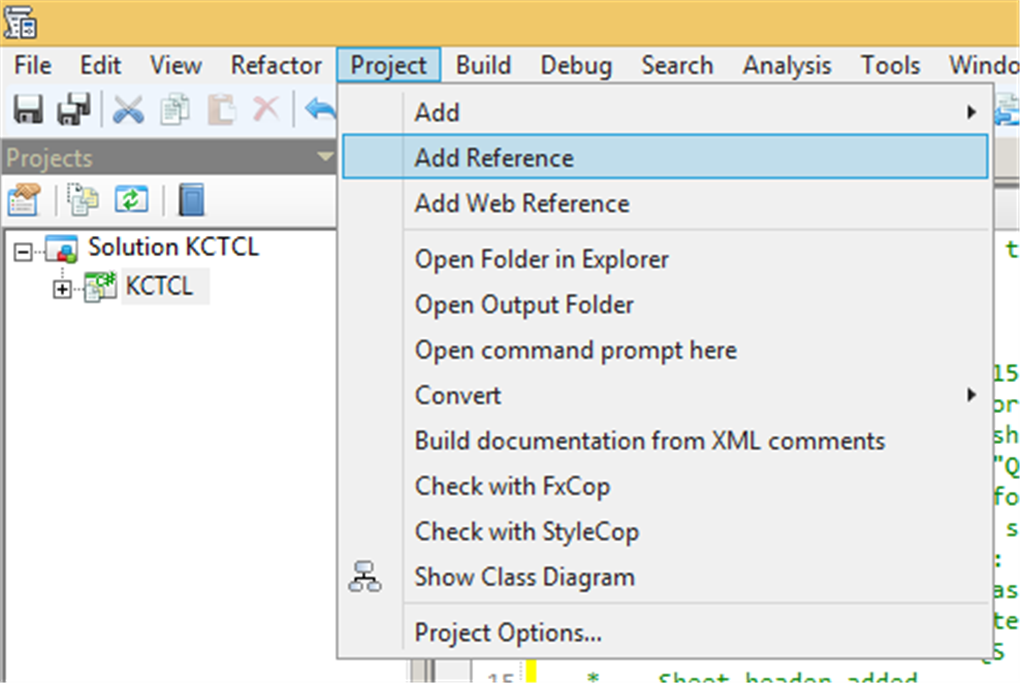
Select Microsoft.Office.Interop.Excel
Build Solution
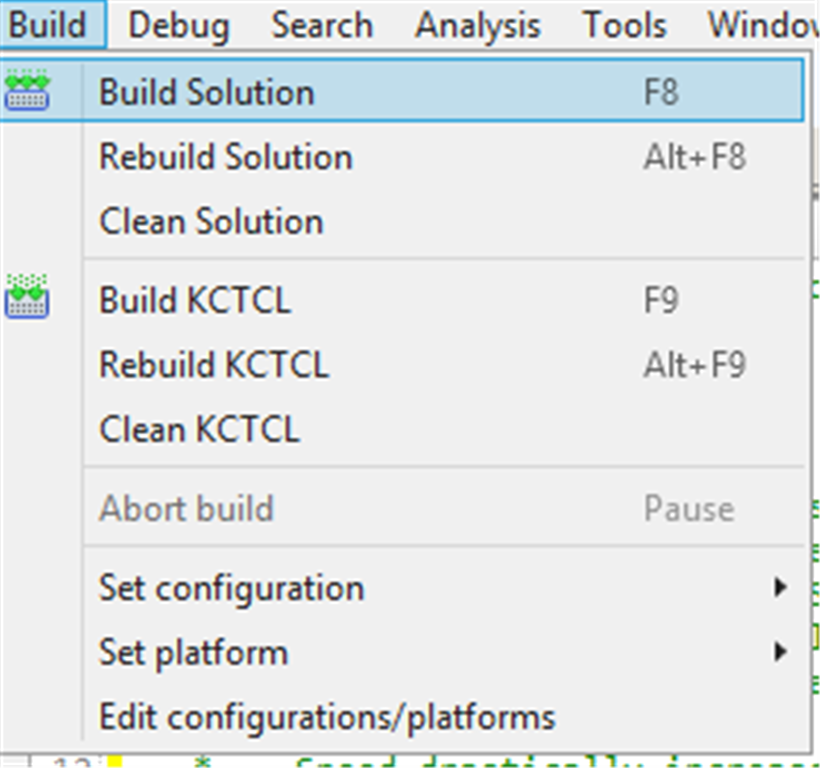
Run