Capture or record screen using ShareX
Capture or record screen using ShareX KCTangNote
1/2/2026: Add section "Extract and concatenate parts of a video".
25/1/2026: Created.
Intro
ShareX can capture screen image and record screen video.
Install ShareX
Open web browser.
Go to https://getsharex.com
Select Download > Setup to download the setup file, open and install.
Configure ShareX
Select Windows Key and search for ShareX.
Open it.
The following main menu will appear on the left:
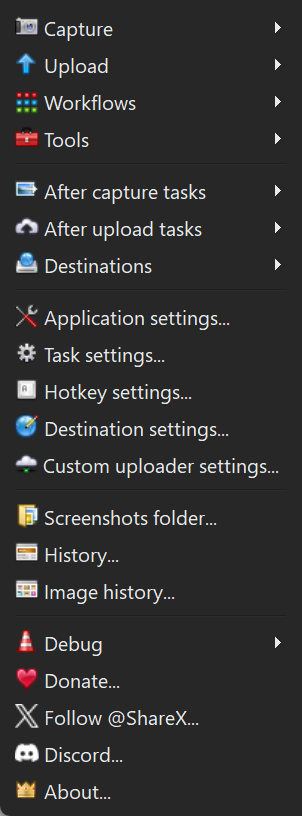
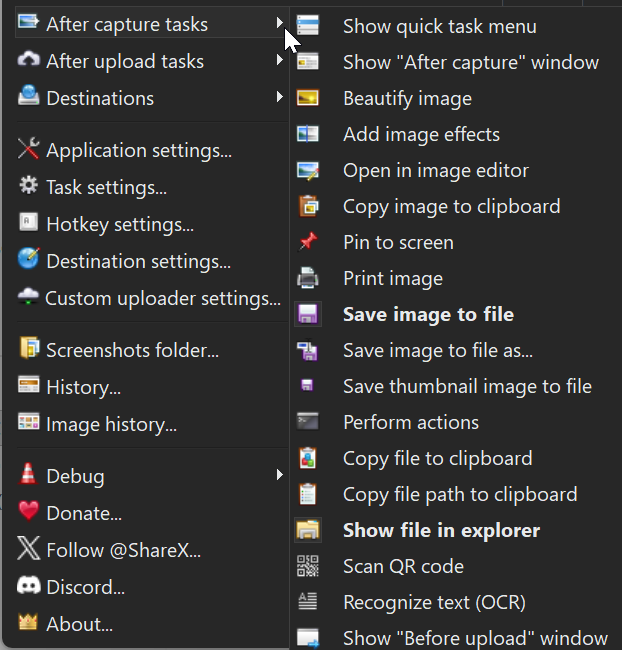
Select After capture tasks.
Select
- Copy image to clipboard (not bold yet below)
- Save image to file
- Show file in explorer
to make them bold:
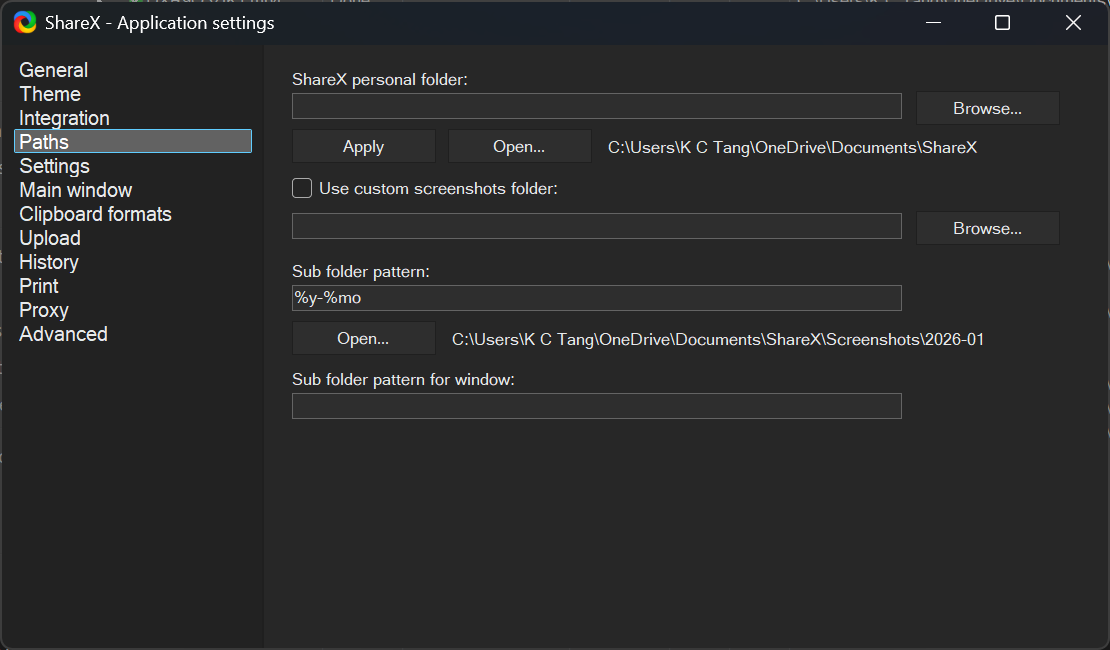
Select Application settings > Browse to select and apply the folder to be used as ShareX personal folder.
Set Sub folder pattern, such as %y-%mo:
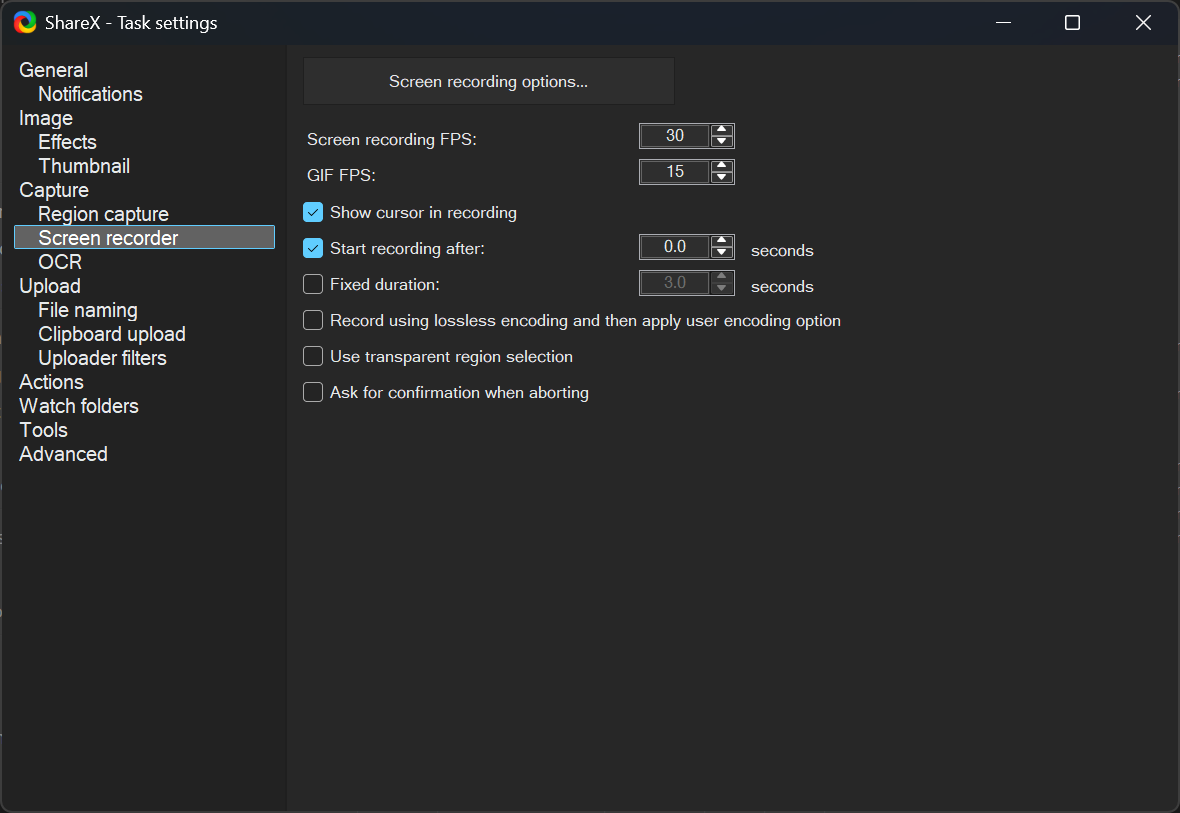
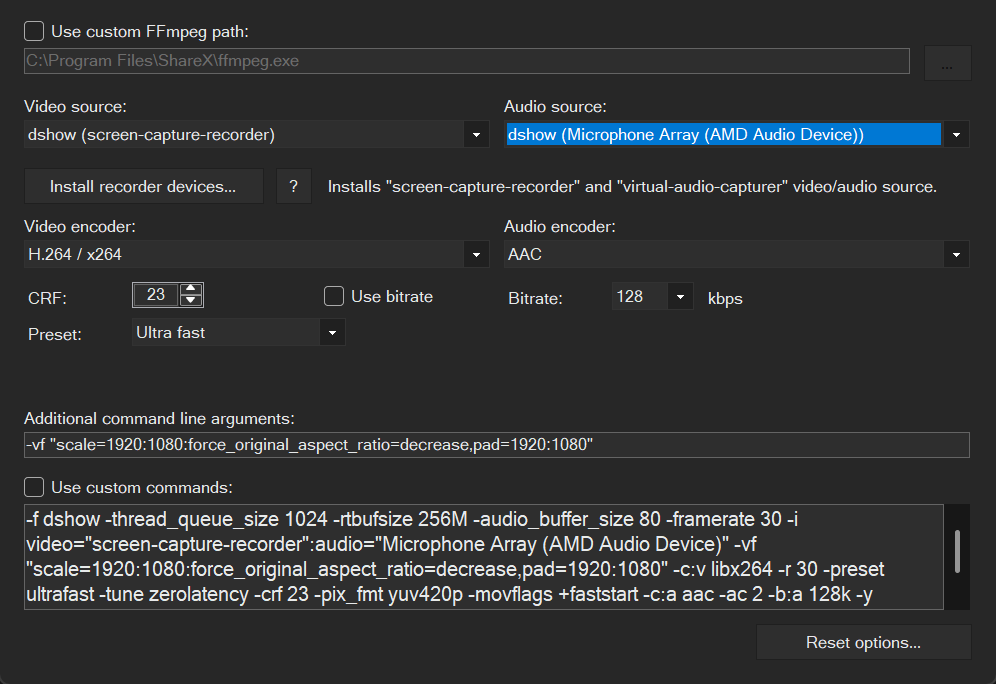
Select Task settings > Screen recorder > Screen recording options:
In the next screen, select Install recorder devices to install the recorder app.
If the choice is not available, select Use custom FFmpeg path, and enter the path name: C:\Program Files\ShareX\ffmpeg.exe or C:\Program Files\ShareX\Tools\ffmpeg.exe depending on the exact location.
Restart ShareX to see whether the choice is available. If available, select to install the recorder app.
After installing the recorder app, restart ShareX.
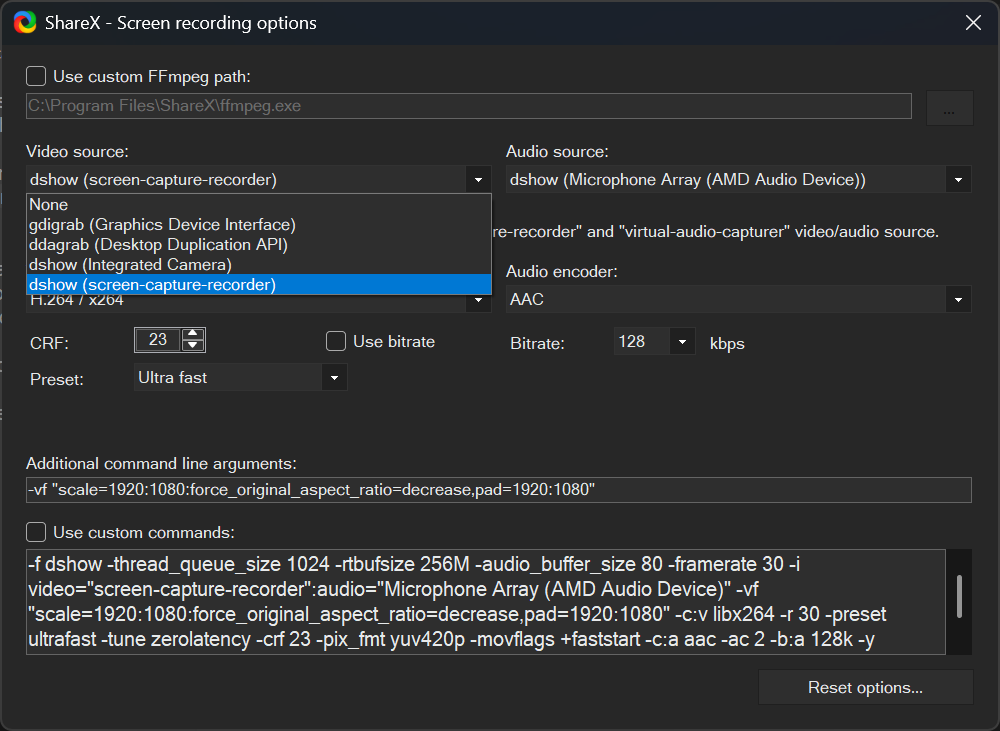
Drop down the Video source list to select dshow (screen-capture-recorder).
Select dshow(Integrated Camera) if camera input is to be captured also.
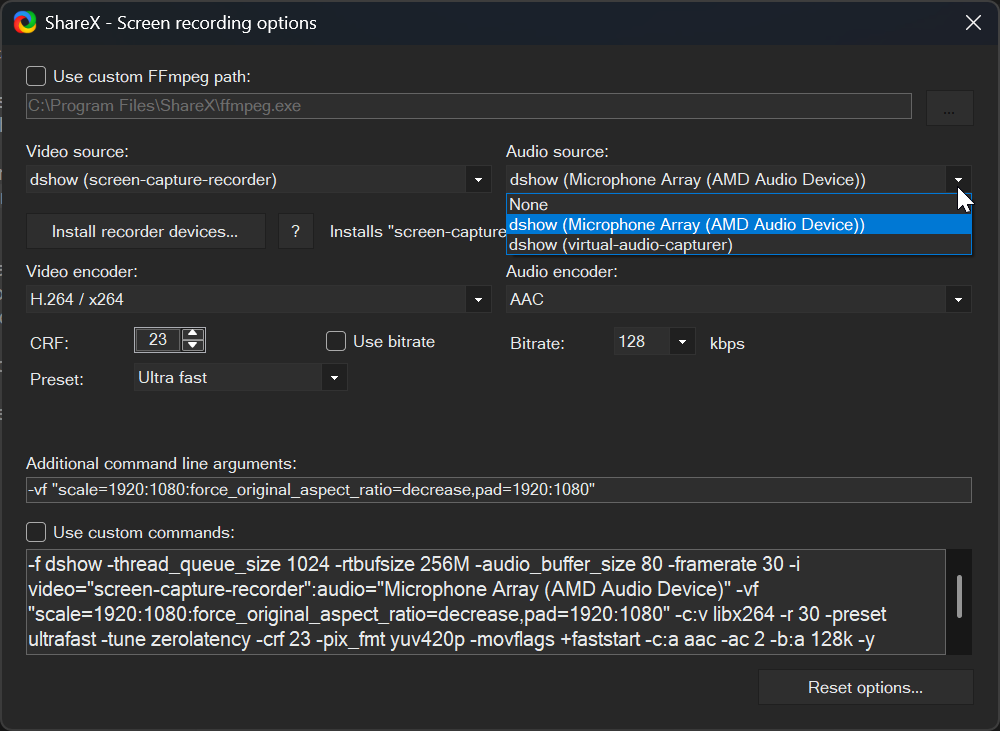
Drop down the Audio source to select the microphone device on the computer.
Set CRF (constant rate factor) = 23 to improve the video quality. Lower = better quality but bigger files.
Preset = Very fast = smaller files with a tiny slowdown.
Enter additional command line arguments:
-vf "scale=1920:1080:force_original_aspect_ratio=decrease,pad=1920:1080"
to suit YouTube requirements for aspect ratio.
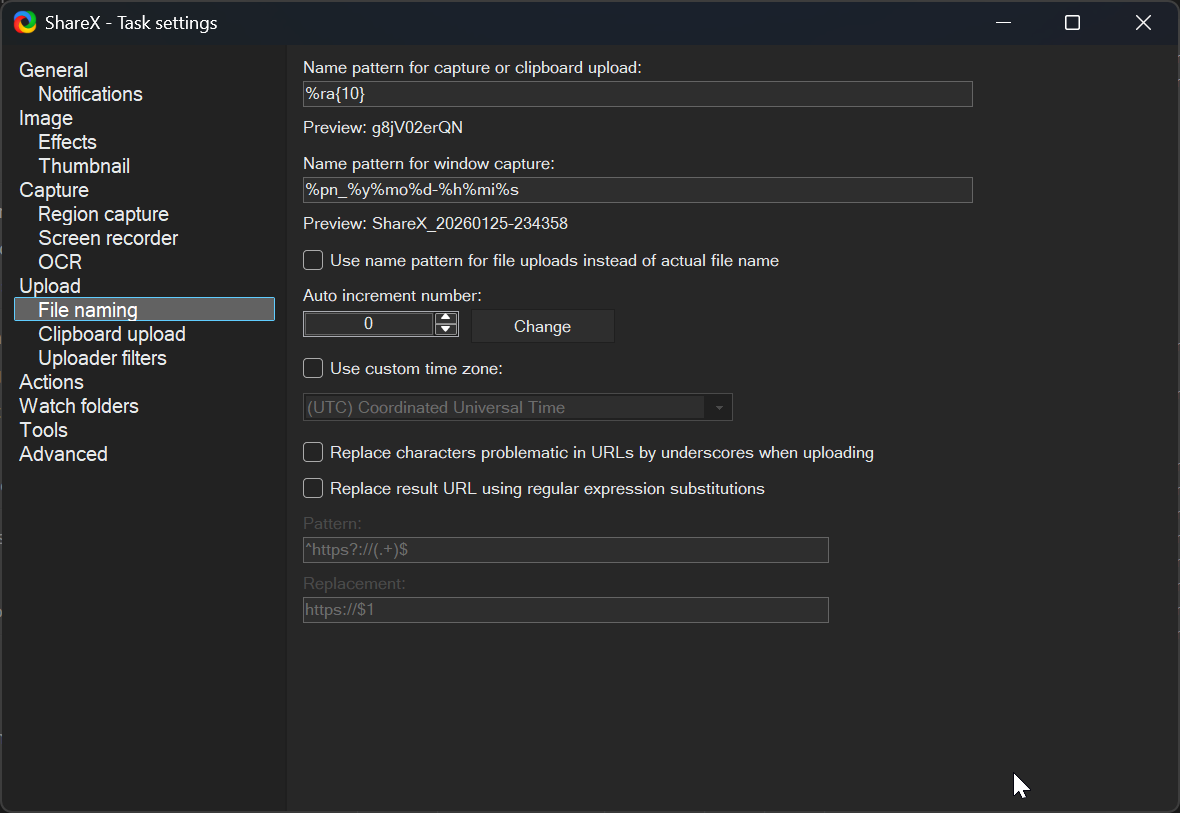
Select Task settings > File naming.
Set name patter for capture or clipboard upload: %ra{10} = random 10 characters.
Set name pattern for window capture: %pn = name of application which screen was captured, the rest should be self-explanatory.
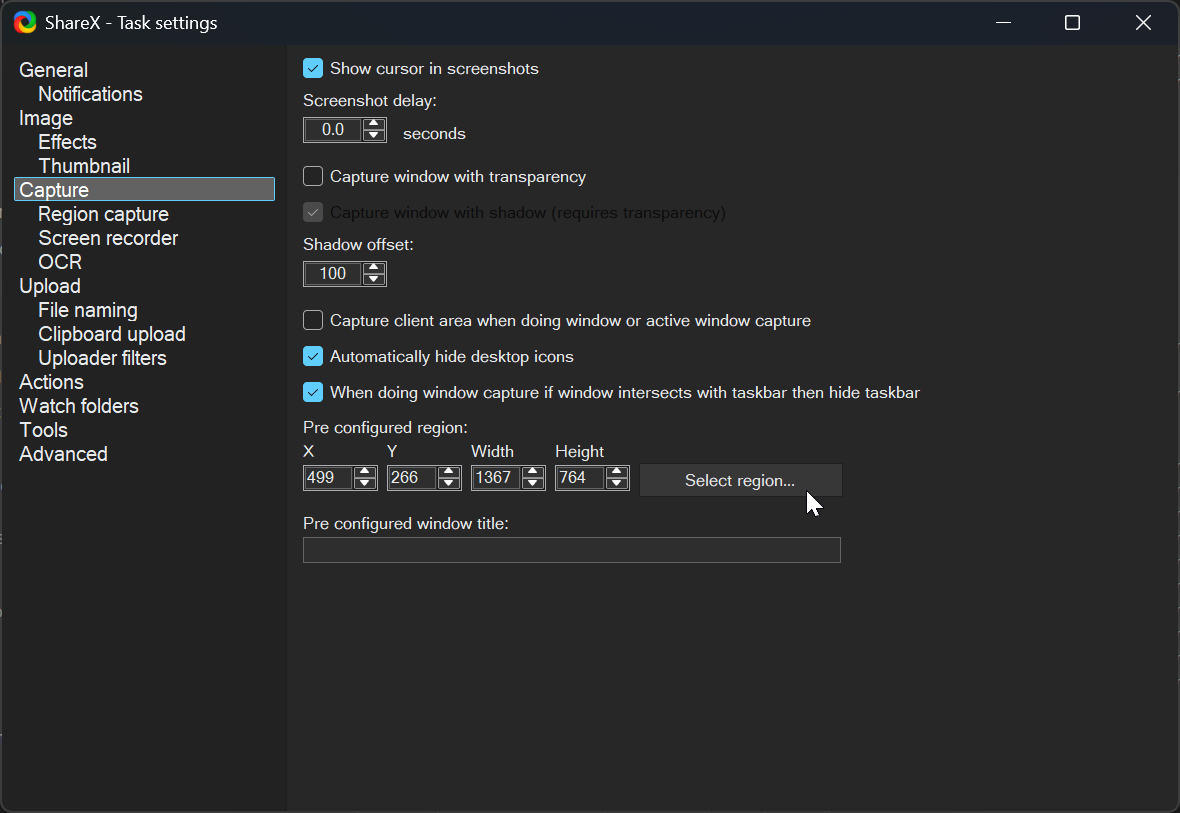
Optionally, select Task settings > Capture.
Decide whether to select the options as shown below.
Decide whether to pre configure a region as shown below. The region can be selected using Select region.
The following are the original hotkey settings:
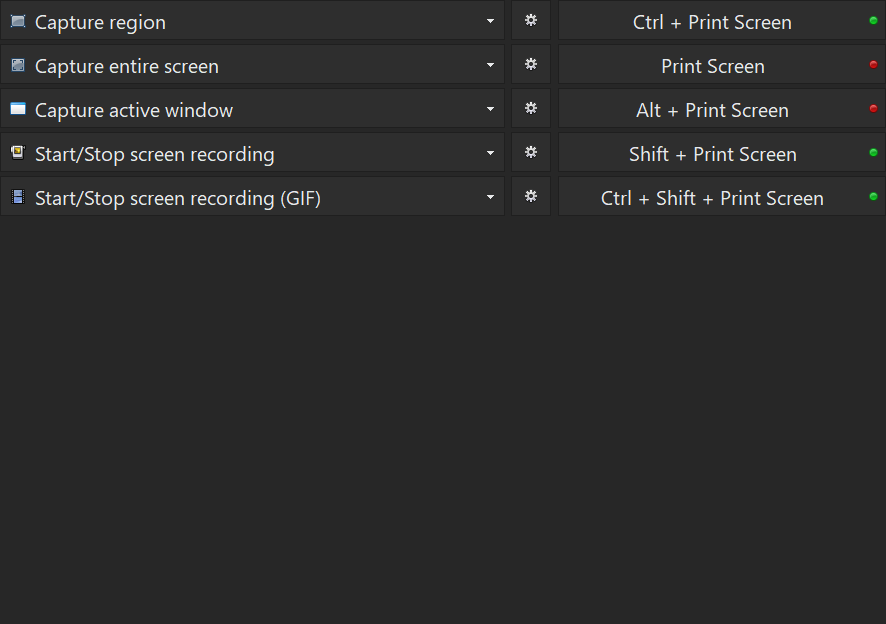
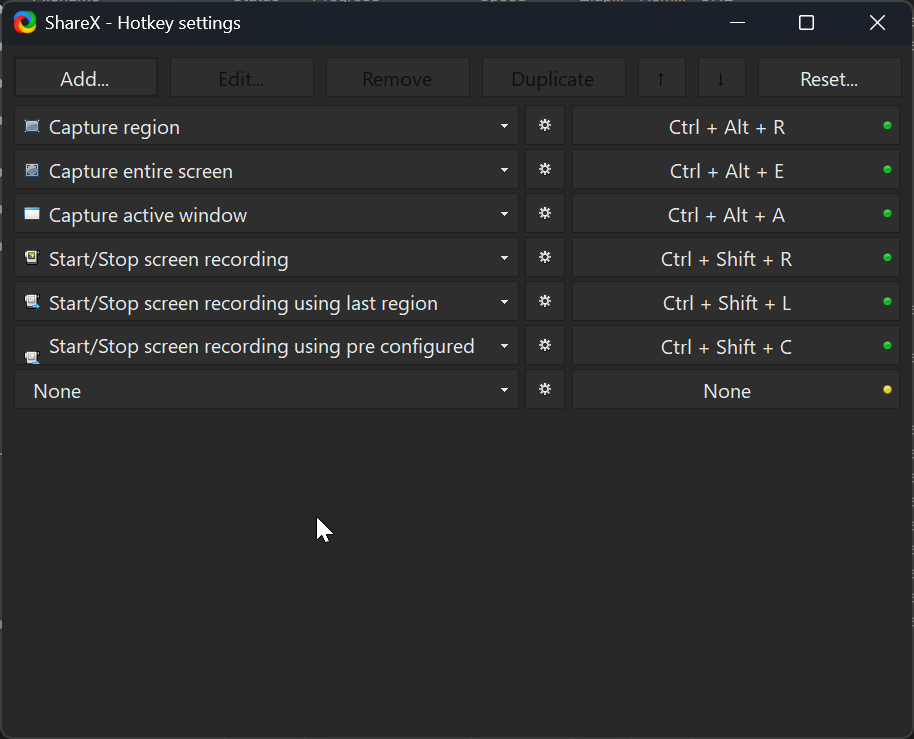
The Print Screen key may be used by other apps. To avoid conflict, re-define the keys as below.
Select Hotkey settings.
Select any definition on the right. It will become Select a hotkey.
Press the desired hotkey combinations at the same time to set.
Select the down arrow at the middle to change the action on the left.
Select Add at the top left to add more actions.
Select Reset on the top right to reset all to the default.
Extract and concatenate parts of a video
(section added, 1/2/2026)
Open Windows command prompt.
Change drive to the folder containing the video to be processed, which can be:
C:\Users\<user name>>cd OneDrive\Documents\ShareX\Screenshots\2026-01Create a file:
> edit mylist.txtEdit it to define the parts to be concatenated:
file 'part1.mp4'
file 'part2.mp4'
file 'part3.mp4'
Use ffmpeg.exe which may reside under "C:\Program Files\ShareX\" or "C:\Program Files\ShareX\Tools".
To get the first part from the start up to 5 minutes, second part from 10 minutes to 15 minutes, and last part from 20 minutes to the end, and to concatenate the three parts to give output.mp4:
> "C:\Program Files\ShareX\ffmpeg.exe" -i input.mp4 -to 00:05:00 -c copy part1.mp4
> "C:\Program Files\ShareX\ffmpeg.exe" -i input.mp4 -ss 00:10:00 -to 00:15:00 -c copy part2.mp4
> "C:\Program Files\ShareX\ffmpeg.exe" -i input.mp4 -ss 00:20:00 -c copy part3.mp4
> "C:\Program Files\ShareX\ffmpeg.exe" -f concat -safe 0 -i mylist.txt -c copy output.mp4
where:
-i = input from
-ss = start time.
-to = end time.
-c copy = copy to.
-f concat = concatenate.
A Windows PowerShell script to do the above (written with the help of Copilot):
- Script filename: editvideo.ps1
- Run in Windows PowerShell.
- Copy the source mp4 file to a new file named input.mp4 (e.g. copy source.mp4 input.mp4). Overwrite it if already exists.
- Dry-run command example: .\editvideo.ps1 ~00:10:00 00:15:00~00:20:00 00:30:00~
- Actual execution command example: .\editvideo.ps1 ~00:10:00 00:15:00~00:20:00 00:30:00~ --run
- ~00:10:00 → from start to 10min
- 00:15:00~00:20:00 → from 15min to 20min
- 00:30:00~ → from 30min to end
- No limit on the number of time ranges.
- Time ranges can overlap and be in any order. Output as listed order.
- input.mp4 will not be altered.
- Change output.mp4 to the final filename when satisfactorily extracted and concatenated (e.g. rename output.mp4 final.mp4).
- Files part1.mp4, part2.mp4, etc. and output.mp4 are temporary files which will be overwritten automatically if the script is executed again.
# ============================================================
# Flexible FFmpeg Split + Concat Script (editvideo.ps1)
# Usage example:
#   .\editvideo.ps1 ~00:10:00 00:15:00~00:20:00 00:30:00~ --run
# ============================================================

param(
    [Parameter(ValueFromRemainingArguments=$true)]
    [string[]]$Segments
)

# --- Path to ffmpeg.exe ---
$FFMPEG = "C:\Program Files\ShareX\ffmpeg.exe"

# --- Input file ---
$InputFile = Join-Path $PSScriptRoot "input.mp4"

# --- Output file ---
$OutputFile = "output.mp4"

# --- Mode flag ---
$RUN = $false
if ($Segments -contains "--run") {
    $RUN = $true
    $Segments = $Segments | Where-Object { $_ -ne "--run" }
    Write-Host "=== RUN MODE: Extracting and concatenating parts ==="
} else {
    Write-Host "=== DRY RUN OUTPUT ==="
    Write-Host "command example:"
    Write-Host "   .\editvideo.ps1 ~00:10:00 00:15:00~00:20:00 00:30:00~ --run"
    Write-Host "   give a number of time ranges separated by a space"
    Write-Host "           ~00:10:00 =    start to 00:10:00"
    Write-Host "   00:15:00~00:20:00 = 00:15:00 to 00:20:00"
    Write-Host "   00:30:00~         = 00:30:00 to end"
    Write-Host "   append '--run' for actual execution"
    Write-Host "fixed input filename = input.mp4, output filename = output.mp4, rename afterward"
}

# --- Function to extract a part ---
function Extract-Part($label, $start, $end) {
    $startLabel = if ([string]::IsNullOrEmpty($start)) { "start" } else { $start }
    $endLabel   = if ([string]::IsNullOrEmpty($end))   { "end" }   else { $end }
    Write-Host "Planned: $label from '$startLabel' to '$endLabel'"

    $ffArgs = @("-loglevel","error","-y","-i",$InputFile)
    if ($start) { $ffArgs += "-ss"; $ffArgs += $start }
    if ($end)   { $ffArgs += "-to"; $ffArgs += $end }
    $ffArgs += "-c"; $ffArgs += "copy"
    $ffArgs += "$label.mp4"

    if (-not $RUN) {
        Write-Host "CMD: $FFMPEG $($ffArgs -join ' ')"
    } else {
        & $FFMPEG @ffArgs
    }
}

# --- Parse segments ---
$index = 1
foreach ($seg in $Segments) {
    if ($seg -match "^~(.+)$") {
        # from beginning to END
        $end = $Matches[1]
        Extract-Part "part$index" $null $end
    }
    elseif ($seg -match "^(.+)~$") {
        # from START to end
        $start = $Matches[1]
        Extract-Part "part$index" $start $null
    }
    elseif ($seg -match "^(.+)~(.+)$") {
        # from START to END
        $start = $Matches[1]
        $end   = $Matches[2]
        Extract-Part "part$index" $start $end
    }
    $index++
}

# --- Concatenate ---
Write-Host "Generating mylist.txt..."
Remove-Item -Force mylist.txt -ErrorAction SilentlyContinue
for ($i=1; $i -lt $index; $i++) {
    Add-Content -Path mylist.txt -Value "file 'part$i.mp4'"
}

if (-not $RUN) {
    Write-Host "CMD: $FFMPEG -loglevel error -y -f concat -safe 0 -i mylist.txt -c copy $OutputFile"
} else {
    & $FFMPEG -loglevel error -y -f concat -safe 0 -i "mylist.txt" -c copy "$OutputFile"
}

Write-Host "=== Extracted parts: part1.mp4 ... part$($index-1).mp4"
Write-Host "=== Concatenated into: $OutputFile"
The equivalent python script:
- Dry-run command example: python editvideo.py ~00:10:00 00:15:00~00:20:00 00:30:00~
- Actual execution command example: python editvideo.py ~00:10:00 00:15:00~00:20:00 00:30:00~ --run
#!/usr/bin/env python3
import sys
import subprocess
import os
import shutil

# --- Locate ffmpeg ---
# On Windows, you can hardcode the ShareX path if you prefer.
# Otherwise, fall back to ffmpeg in PATH.
FFMPEG = r"C:\Program Files\ShareX\ffmpeg.exe"
if not os.path.isfile(FFMPEG):
    FFMPEG = shutil.which("ffmpeg") or "ffmpeg"

INPUT_FILE = "input.mp4"
OUTPUT_FILE = "output.mp4"

def extract_part(label, start, end, run):
    start_label = "BEGIN" if not start else start
    end_label = "END" if not end else end
    print(f"Planned: {label} from '{start_label}' to '{end_label}'")

    ff_args = [FFMPEG, "-loglevel", "error", "-y", "-i", INPUT_FILE]
    if start:
        ff_args += ["-ss", start]
    if end:
        ff_args += ["-to", end]
    ff_args += ["-c", "copy", f"{label}.mp4"]

    if not run:
        print("CMD:", " ".join(ff_args))
    else:
        subprocess.run(ff_args, check=True)

def main():
    args = sys.argv[1:]
    run = False
    if "--run" in args:
        run = True
        args.remove("--run")
        print("=== RUN MODE: Extracting and concatenating parts ===")
    else:
        print("=== DRY RUN OUTPUT only, use --run for actual execution ===")

    parts = []
    index = 1
    for seg in args:
        if seg.startswith("~"):
            # from beginning to END
            end = seg[1:]
            extract_part(f"part{index}", None, end, run)
        elif seg.endswith("~"):
            # from START to end
            start = seg[:-1]
            extract_part(f"part{index}", start, None, run)
        elif "~" in seg:
            # from START to END
            start, end = seg.split("~", 1)
            extract_part(f"part{index}", start, end, run)
        else:
            print(f"Invalid segment format: {seg}")
        parts.append(f"part{index}.mp4")
        index += 1

    print("Generating mylist.txt...")
    with open("mylist.txt", "w") as f:
        for p in parts:
            f.write(f"file '{p}'\n")

    concat_cmd = [FFMPEG, "-loglevel", "error", "-y",
                  "-f", "concat", "-safe", "0",
                  "-i", "mylist.txt", "-c", "copy", OUTPUT_FILE]

    if not run:
        print("CMD:", " ".join(concat_cmd))
    else:
        subprocess.run(concat_cmd, check=True)

    print(f"=== Extracted parts: {' '.join(parts)}")
    print(f"=== Concatenated into: {OUTPUT_FILE}")

if __name__ == "__main__":
    main()