Taking-off Techniques
Taking-off Techniques KCTangNote
18/2/2023: Revised.
23/3/2020: Numeric numbering system adopted. Punctuation standardised.
27/7/2019: Created.
Taking-off
- The process of measuring the quantities is called "taking-off" or “quantity-take-off” (QTO). Person(s) taking-off are called "Taker(s)-off".
(added, 18/2/2023)
Mode of taking-off 計量的手法
- Measure in a logical manner, for example, follow the construction sequence or alternative logical sequence.
應按有系統的次序計算,例如按施工順序或主客關係 - Measure consistently from one direction to the other direction.
一致從一方算至另一方 - Set out dimensions in a consistent manner of length, width and height.
將尺寸按長闊高的須序輸入 - Avoid breaking down irregular shapes into small pieces and then adding up.
避免把不規則的形狀分拆得太細來計算然後加總 - Measure overall first and making adjustments.
應計最大框,然後扣減調整 - Measure related items in composite manner, e.g. tile and screed, plaster and paint, all layers of roof covering.
以組合式的方法把關連項一起計,編清單時才分項,例如塊料面層和找平、屋面層
Measure perimeters
-
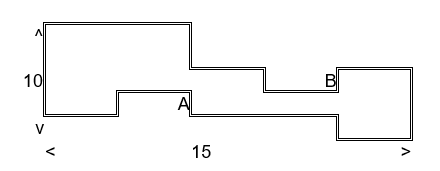
When measuring the perimeter of the shape bounded below:
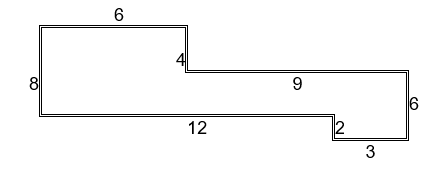
- Instead of measuring as:
-
8 + 6 + 4 + 9 + 6 + 3 + 2 + 12
                = 50
-
- Measure as:
-
(12 + 3 + 8 + 2) x 2
                = 50
-
- That is, measure the overall dimensions:
-
(15 + 10) x 2
                = 50
-
- It can be observed that the perimeters of the following shapes are all the same as:
-
(15 + 10) x 2
                = 50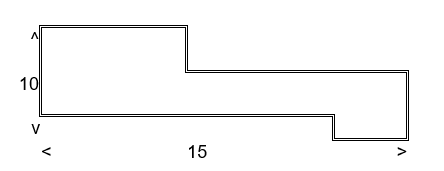
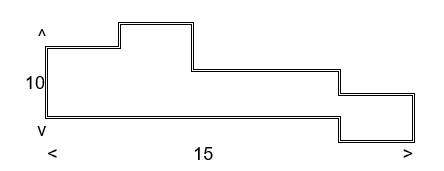
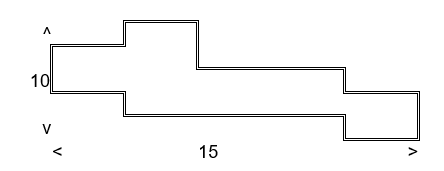
-
- No adjustment is required for rebates.
- Only when there are recesses that adjustments are required, such as:
-
(15 + 10) x 2 + 2 x A + 2 x B
                = 50

-
Adjust from outer to inner perimeter
-
For the following diagram:
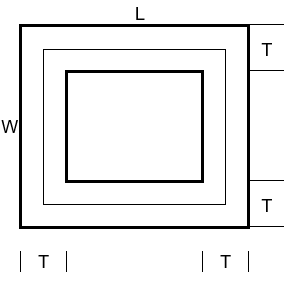
- External perimeter:
-
= (L + W) x 2
-
- Internal perimeter:
-
= (L + W) x 2 – T x 8
                i.e. 2 T per external corner
-
- Center line perimeter:
-
= (L + W) x 2 – T x 4
                i.e. 1 T per external corner
-
-
The outer, inner and centre line perimeters are of the same lengths below. An external corner offsets an internal corner:

-
For the following diagram, offsetting each pair of external corner and internal corner will result in leaving only 4 external corners for adjustment:
Measure areas
-
When measuring the area bounded below:

- Instead of measuring as:
-
6 x 10 + 9 x 6
                = 60 + 54
                = 114
-
- Measure as:
-
15 x 10 - 9 x 4
                = 150 - 36
                = 114
-
-
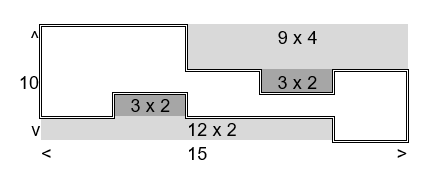
When measuring the area bounded below:

- Instead of measuring as:
-
(10 – 2) x 6 + (9 – 6) x (10 - 2 – 4) + (15 – 9) x 6
                = 48 + 12 + 36
                = 96
-
- Measure as:
-
15 x 10 - 9 x 2 - 9 x 4
                = 150 - 18 - 36
                = 96
-
- Instead of cutting an irregular area into pieces to measure, it is better to measure the overall area first and make deductions, because:
- Cutting into too many pieces may make finding the dimensions of each piece difficult, like the case of (9 – 6) x (10 - 2 – 4)
- It may be easy to miss one or two pieces
- Measuring the overall area first will ensure that the areas will not be under-measured.
Measure overall
-
From the above, it can be seen that using the overall dimensions to measure the overall area and overall perimeter first and then make adjustments for rebates and recesses will be more convenient:
-
Area:
-
= 15 x 10 – 12 x 2 – 9 x 4 – 3 x 2 – 3 x 2
                = 78
-
-
Perimeter:
-
= (15 + 10) x 2 + 2 x 2 + 2 x 2
                = 58
-
Measure rooms - Imagine a cube with 6 faces
-
For a room of the following plan shape:
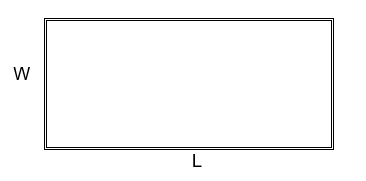
- The room has 6 faces: floor, ceiling, and 4 walls.
- Floor area = ceiling area:
-
= plan area
                = L x W
-
- 4 wall areas:
-
= perimeter x (room height – skirting height)
                = (L + W) x 2 x (H – s)
-
- Skirting length:
-
= perimeter
                = (L + W) x 2
-
- When adding objects to a room, always imagine it as a cube with 6 faces, and check the effect of its 6 faces on the room finishes.
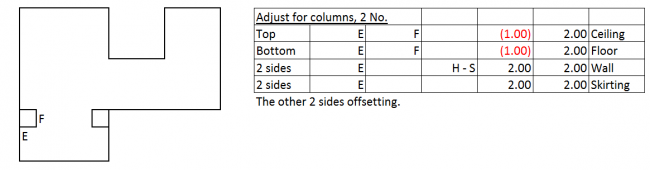
Adjust for columns
-
For a room of the following plan layout:
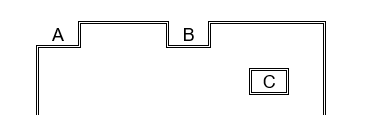
- A is a column with same finishes as wall:
- Top and base: deduct floor finishes: deduct ceiling finishes = same area
- 2 exposed sides: offsetting 2 hidden sides = no effect on wall finishes area or skirting length.
- B is a column with same finishes as wall:
- Top and base: deduct floor finishes: deduct ceiling finishes = same area
- Front and back: offsetting = no effect on wall finishes area or skirting length
- 2 sides: add wall finishes area and skirting length.
- C is a column with same finishes as wall:
- Top and base: deduct floor finishes: deduct ceiling finishes = same area
- 4 sides: add wall finishes area and skirting length.
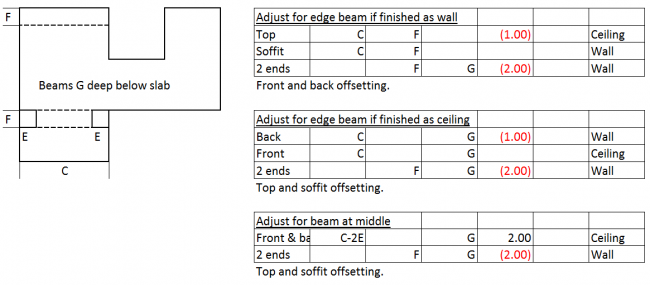
Adjust for beams
-
For a room with the following ceiling section:
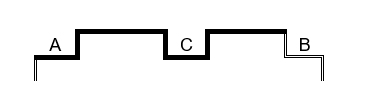
- A is a beam with same finishes as ceiling:
- Top and soffit: offsetting = no effect on ceiling finishes
- Front and back: deduct wall finishes : add ceiling finishes = same area
- 2 ends: deduct wall finishes.
- B is a beam with same finishes as wall:
- Top and soffit: deduct ceiling finishes: add wall finishes = same area
- Front and back: offsetting = no effect on wall finishes
- 2 ends: deduct wall finishes.
- C is a beam with same finishes as ceiling:
- Top and soffit: offsetting = no effect on ceiling finishes
- 2 sides: add ceiling finishes
- 2 ends: deduct wall finishes.
Adjust for windows and doors
- The idea of checking the 6 faces of an object when inserting into a room can also be applied to windows and doors.
- Windows:
- Deduct window opening
- Add head, cill, and 2 reveals.
- Doors:
- Deduct door opening
- Add head, floor, and 2 jambs.
Measure room finishes on a schedule
-
Measure surfaces of a room (same concept of measuring overall first then making adjustments can be applied to external elevations and roof finishes):

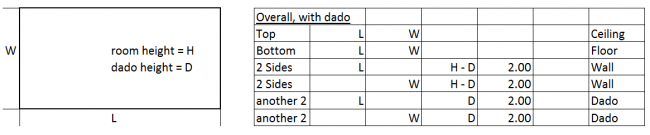
-
Adjust for recesses:

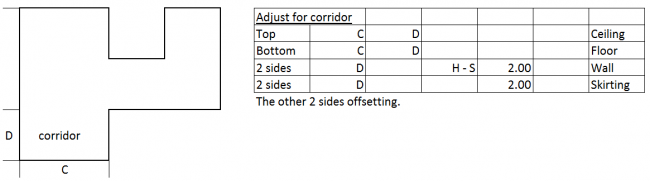
-
Adjust for columns:
-
Adjust for beams:
- For a room with false ceiling, the wall finishes will stop at about 50 mm to 100 mm above the edge of false ceiling, depending on the design.
- The ceiling voids are usually not finished except for open grid false ceiling.
-
Adjust for windows with fins:

-
Adjust for bay windows:
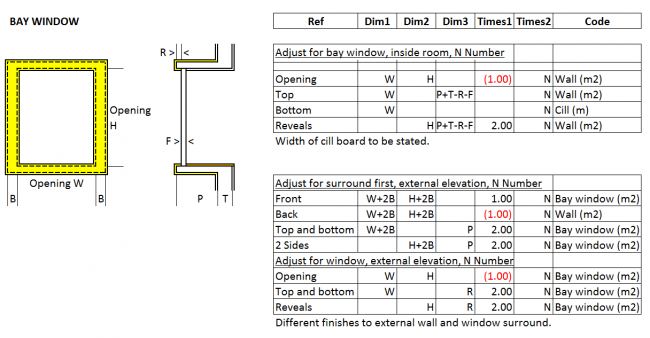
-
Adjust for doors:

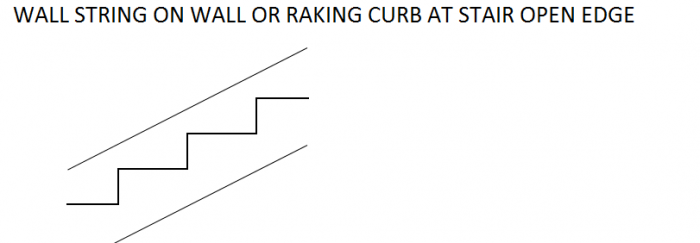
Measure staircase well and staircases
-
Names:


-
For a staircase of the following plan and section:

- It is better to measure the stairwell first and then adjust for the landings and stairs.
-
Cut a segment of constant plan size with two horizontal planes in case of varying stairwell plan sizes.
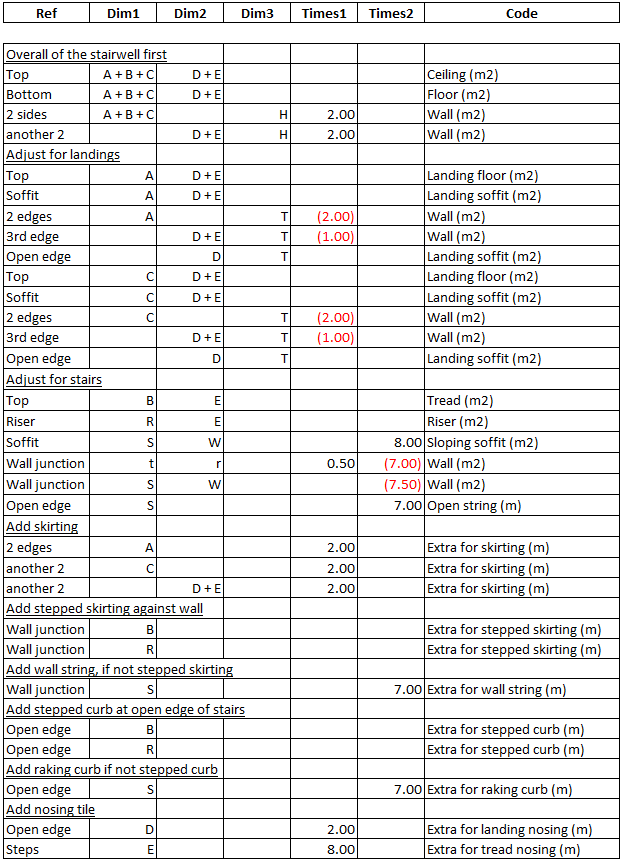
- Extra for items described above means that the items have been measured without deducting the background / principal items in which they occur.
- "Extra for skirting" should mean "Extra over wall finishes for skirting".
- When billing the quantities in the Pricing Schedules, the wall finishes displaced by the skirting should be deducted.
- Getting the total extra over quantity first and then make deductions later will be quicker than doing the deduction whenever the extra over item is measured.
- For example, total wall finishes to be deducted = total skirting length x skirting height.
- It may also be possible in some cases to bill simply as an extra over item without making deduction of background quantities.
- The deduction is to be considered in the unit rate.
- The full phrase of extra over items should be in the form of “Extra over X for Y”.
- “Extra for Y” should only be used if X is understood from the context.
- Usually item Y will follow item X immediately in the Pricing Schedule.
- “Extra over for Y” is not a good phrase.
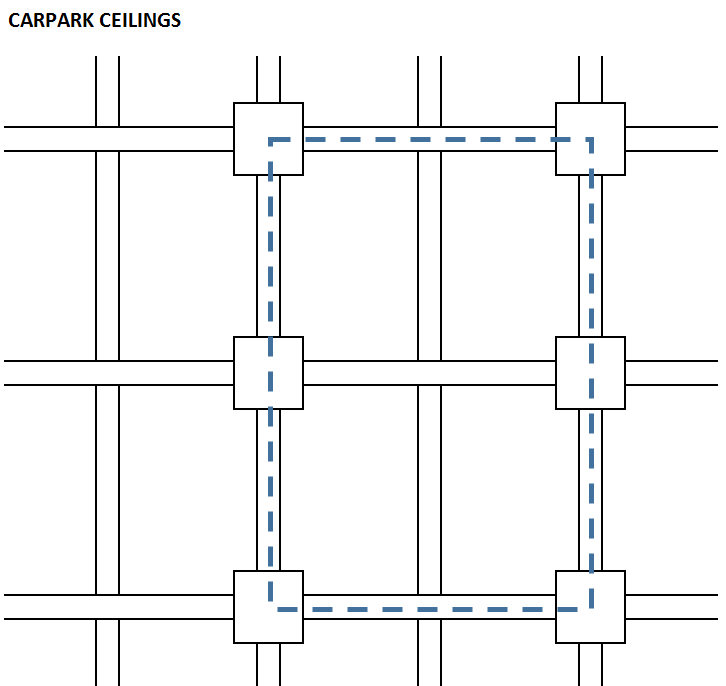
Measure carpark ceilings
-
When measuring carpark ceiling and beam finishes without exact beam dimensions, the areas may be estimated by measuring the ceiling and beam surface areas within a representative zone of ceiling to obtain the (area of finishes) : (area on plan) ratio, and use the ratio to multiply the carpark ceiling plan area.
Measure external elevations
-
There can be three approaches to measuring the area of the external wall finishes:
- (Overall external perimeter of building using the method as described in “Measuring perimeters”) x (height of elevation from base to top of roof parapet or curb), if all floors are of the same plan shape
- Sum of (overall external perimeter of a floor x floor height x relevant number of floors) of all floors, and similar for roof parapets and curbs
- Sum of (length of a particular elevation x height of that elevation) going around the building a clockwise or anti-clockwise direction, if the building elevations are rather complicated and require different finishes.
- For the top and inner face of roof parapets and curbs, measure the centre line perimeter and the inner perimeter using the method as described in “Adjusting from outer to inner perimeter”.
- Adjust for windows, balconies, doors, fins, window surrounds, canopies, openings, etc. paying attention to turn-ins at openings.
- Measure horizontal and vertical movement joints at specified locations.
Measure scaffolding
- While scaffolding is usually priced as a lump sum in the Preliminaries, the lump sum is still estimated based on the area of the scaffolding.
- The area of scaffolding is calculated based on the (perimeter of the outer face of scaffolding grid) x (height of scaffolding grid from base support of scaffolding to top of scaffolding grid) ignoring projection of individual scaffold members beyond the grid.
- For double-row scaffolding, the outer face is about 600 mm from the building face.
-
Its perimeter will be bigger than the building’s external perimeter, except at lightwells:

- The top of scaffolding should be about 1.1 to 1.5 m above top of roof parapet for safety purposes.
- Catch fans, support brackets at base of scaffolding, temporary rain shelters on top of scaffolding, safety screens, etc. may be measured as extras.
Measure roofing
- Roofing comprises a number of layers (levelling layer, waterproofing layer, insulation layer, finishing layer).
- Their areas may not entirely be the same.
- However, it is advisable to measure one area for them first and make adjustments for surface channels, skirtings and lining to curbs.
- Levelling layers will have varying thickness to provide falls.
- Areas of different thickness should be measured separately.
- However, it is not advisable to group the thicknesses in stages of 25 mm to simplify the measurement and number of items.
Measure pipework, conduits and wiring, duct work for major building repair works
- For major building repair works, plumbing, drainage and M&E work are usually priced as lump sums.
- It is advisable to have some breakdown though not necessarily to every detail according to HKSMM4.
- It is advisable to require that the above-ground drainage system is priced:
- by the number of vertical and common stacks
- by the number of branches (e.g. flats, kitchens, bathrooms, balconies, etc.)
- to enable better evaluation and comparison of costs per different buildings
- to ease the valuation of variations involving a change to the number of stacks or branches.
- Fresh water supply pipes may branch out from individual meters to individual flats on different floors and can only be measured by lengths rather than by stacks or branches.
- Pipework after private meters is usually regarded as a private item.
- Flushing water supply pipework can be priced by the number of stacks and branches because it usually uses one common meter.
- Conduits and wiring in the final circuits are usually not separately measured but allowed for in the unit rates for lighting points, power points, socket points, etc.
- Rising mains and busbars are measured.
- Extensive fire services sprinkler system and air conditioning duct work are usually measured in detail.
- When detailed measurement is done, the measurement should follow the main route first and then the branches in a systematic manner.
- While pumps, sanitary fittings, fire service inlets, hose reels, sprinklers, fuse switch boards, lighting points, power points, socket points, detectors, some pipe ancillaries (valves, meters, etc.) may be counted once on plan or based on the schematic diagrams, it may be better to pick up the in-line fittings (bends, tees, branches, junctions, reducers, end caps, pipe sleeves) while measuring the routes because the necessity of these in-line fittings are not entirely shown on the drawings and will depend on the taker-off’s imagination of how the routes go up, down and turn.
- It is useful to draw isometric diagrams to illustrate and understand the routing, ups, downs and turns.
- For pipework, in-line fittings not exceeding 54 mm diameter are not measured according to HKSMM4.
CAD, BIM and QTO software
- CAD drawings themselves also contain name, dimension and quantity information of the objects on the drawings such that the information can be exported as a database or to spreadsheets for use.
- Objects like doors can be represented by door marks. Summing up the number of door marks can give the number of doors.
- For objects like beams, the beam marks are not sufficient for the measurement of the length, concrete volume and formwork area. Specific measurements are required.
- Furthermore, things which appear to have been properly drawn as seen on plan may be the superimposition of discreet lines which lengths do not serve to provide the quantity of the things as seen.
- Therefore, commercial QTO software has been available to take-off quantities from CAD drawings, basically, by picking the points or tracing the lines or polygons of the objects on the CAD to obtain their numbers, lengths or areas, and further calculate the volumes. This can still be a tedious process when one has to take-off object by object on screen instead of manually enter the dimensions on a spreadsheet.
- Some better QTO software can automate the extraction of some meaningful quantities from the CAD drawings. Some can further link the quantities to the cost estimates or bills of quantities.
- BIM models all objects as self-complete entities in 3D. The information attached to an object can give the name, dimensions, component quantities, etc. of that object. The information is readily available for use, and the quantities can be very accurate geometrically.
- However, the classification of the objects and the demarcation between different objects may not be exactly suitable for generating quantities for costing. Adjustments would need to be made.
- Some QTO software still uses the method of picking and tracing to get the quantities from the models. Some are more advanced to extract the quantities directly from the models.
- The models may have erroneous overlaps or gaps or omissions which would still need the taker-off to adjust the quantities to correct the erroneous effect.
- The QS still has to use skill and knowledge to properly describe the objects in the bills of quantities and ensure that the quantities are correct for costing and pricing.
(added, 18/2/2023)