Install OpenSSH services
Install OpenSSH services KCTangNote
29/1/2026: "gedit" changed to "micro".
8/12/2024: moved to "install VNC Server" page.
26/5/2020: systemctl file command revised.
27/5/2019: Security settings added.
11/4/2018: Page added.
Intro
OpenSSH enables remote client computers and smartphones to access the server computer's text based terminal shell in a secured manner. "SSH" stands for secured shell.
Install OpenSSH server
Execute:
$ sudo apt install openssh-server
The software will be installed at /etc/ssh.
In case of complaint of no directory, execute to make directory first:
$ sudo mkdir /etc/ssh
Edit config file:
$ cd /etc/ssh
$ sudo micro sshd_config
Specify:
# Port 22                             (which is the default port)
Port 2nnn                             (change to some other 4-digit port, 2nnn)
# PermitRootLogin prohibit-password   (meaning no password required)
PermitRootLogin no                    (meaning no root login)
(security settings added, 27 May 2019)
Restart the service:
$ sudo systemctl restart sshd.service
or
$ sudo systemctl restart ssh.service
Check status:
$ sudo systemctl status sshd.service
If found disabled:
$ sudo systemctl enable ssh
(status check added, 26 May 2020)
Change the internet router to permit the use of port 2nnn.
The above is already sufficient for use. Read https://help.ubuntu.com/lts/serverguide/openssh-server.html for more configurations, if desired.
Install SSH client on Windows
Download Putty from https://www.putty.org/ and install.
Enter the Host Name, change the Port to 2nnn, highlight Default Settings and press Save:
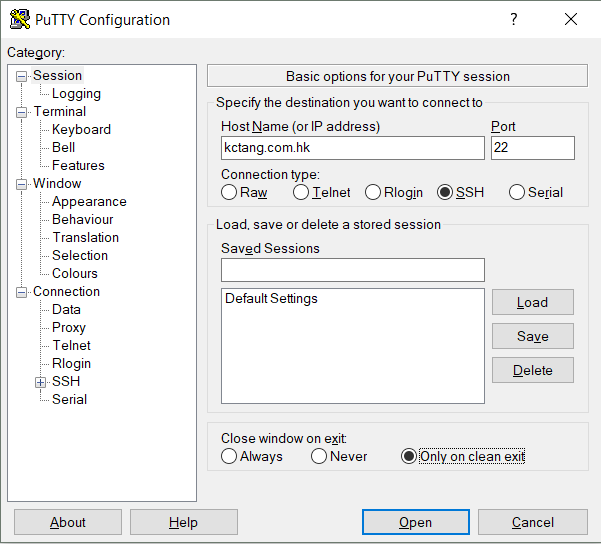
"Only on clean exit" is the default. When the server's terminal window is exited with "exit" or "logoff", the PuTTY screen and connection would only close if other processes using the PuTTY connection have all been closed.
Press Open.
Accept the next screen to confirm the server's security key shown, if trusted. This would be necessary for the first time only.
Log in as the usual command terminal. No graphical interface is provided.
Use PuTTYgen that comes installed with PuTTY to generate key pairs, only if required. Read its Help.